December 8, 2017

Day 8 - Breaking in a New Company as an SRE

By: Amy Tobey (@AlTobey)
Edited By: Tom Purl (@tompurl)

To put it mildly, 2017 has been an interesting year for everyone. My story has its own bumps and advances, including changing jobs twice recently. Changing jobs is a reality many of us face, hopefully voluntarily. It happens infrequently enough that it isn’t something we spend a lot of time talking about. Life’s trials tend to teach us quickly and I hope to share some of what I’ve learned with you.

Backstory

I started the year as an SRE on the CORE team at Netflix. For various reasons, mostly involving stress, I ended up being fired in late June. I only took a couple days to cool off before kicking off interviews. I knew my financial situation would be stable because of the severance package, but I still wanted to have something lined up as soon as possible. Interviewing can sometimes take many weeks or even months so I got started right away.

My first stop was Apple. I knew lots of engineers from my Cassandra days and a friend there had previously pinged me to see if I was interested. I let them know I was available and that process took off.

I also started talking to two other large tech companies, eventually withdrawing from both. One was too far away and had a lengthy study guide for interviews that I was not willing to commit to. The other was going to make an offer but I found their interview process too heavily tilted towards technical ability with little to no discussion of culture or the day-to-day work.

Finally, I interviewed with two smaller infosec companies. On one call we mutually recognized there was no fit while the other moved on to make me a compelling offer.

I eventually went with the Apple offer as it paid more and I knew more people. The difference I didn’t adequately account for was the commute; the security company is remote and Apple involved a long shuttle commute in bay area traffic.

I was only at Apple for 6 weeks and during that time I was trying to experience it with a beginner’s mind. I read docs, code, and listened a lot. In the end, it wasn’t a culture fit for me and the commute was unbearable at 1-2 hours each way, so I quit.

The day after quitting, I set up a call with Tenable and they graciously renewed their offer to me which I accepted immediately. This time I took a couple weeks off because I really wanted to give them my best start.

Day Zero

Since my job is remote, they mailed me my gear. It arrived the Friday before my first day and I took inventory and set it all aside. Some of my accounts had been activated early, but I resisted the urge to start nesting before I was official.

Week 1

I found some bugs with the Windows 10 installation on my laptop on the first day. I spent far too much time dinking with it and finally emailed my managers and IT and got it sorted out within a few hours. I still ended up installing Linux because I found some things about the standard image too constricting.

Besides messing with my laptop, I had a few meetings and spent a lot of time reading docs and code. I spent the remainder getting to know folks over chat and video calls.

Lessons:

  • Start using collective speech immediately, i.e. “ours” instead of “yours”.
  • Reach out for help with IT problems more quickly, even if the issue at hand appears user-serviceable.
  • Reading docs and code in downtime was a great idea.
  • Spending time keeping up with chat rooms is a good way to get to know people in a remote job.
  • Keep notes about things that are troublesome like my laptop issues and bumps in setting up accounts (more on this later).
  • Generate 4KB ssh keys with a good password to impress your colleagues when they copy/past your pubkey.
  • Install Linux sooner :)

Week 2

With a working laptop and most of my accounts set up, it was time to start digging in. I got set up on the bastions and started looking at some tickets for our databases. Getting into live machines for analysis helped expose gaps in the new-hire onboarding workflow. Where possible I updated docs and other things were added to my notes.

Lessons:

  • Find a ticket to work on right away and give yourself plenty of time. I hit a few snags with access and local conventions that slowed me down.
  • Try to figure things out by searching docs and poking.
  • Start committing small changes to the team’s primary repos. e.g. formatting, spelling, tests, and minor bug fixes.
  • Set a time limit on self-discovery and ask for help.
  • I don’t always take notes, but when I do, it’s usually during my first month on the job.

Week 3

For my third week, the company flew me to headquarters for the official orientation. The first day of company overview, culture introduction, and getting to know the other new hires was enjoyable and interesting. The next couple days were largely sales-focused. My manager and one of my peers flew in and sprung me from those days. We went over our ongoing projects and prioritized work while we got a feel for each other. On the last day of the week I started researching projects we prioritized and started coordinating with other SREs on how to approach things.

Lessons:

  • Get to know one or two people in your hiring “class”. It’s fun and you’ll probably run into these folks again and again regardless of which department each of you are in.
  • Ask about orientation and find out if you really need to attend all of it. At the SaaS companies I’ve experienced there is a lot of content for sales folks (often much higher turnover than other departments) that might not be very relevant to an SRE.
  • Remember to install your password manager on your travel device (unless international).

Week 4

In my reviews of the Cassandra setup I found a few things that needed addressing. Rather than handing off the work that needed to be done, I decided to take it on a little before I felt ready. This gave me the opportunity to start committing to our Ansible repos. I wrote a bit of shell code and updated a bunch of playbooks that led me through learning the basics I needed to work with Ansible daily. I got one project done that was blocking progress for dev teams which led to making friends in those teams as I worked with them.

By this time I was starting to get questions from managers and peers about how I was liking the company and people. I was happy to reply in the positive and kept mental notes about specific things people asked.

Lessons:

  • Find a project in your wheelhouse to start with. For example, I knew Cassandra or Linux tuning would be a good place for me. Find some familiar ground and use it to launch yourself forward.
  • Clearing blocker tickets is an excellent way to make friends in dev teams.
  • Remember to give yourself extra time to adapt to the new environment.

Beginner’s Mind

A few years ago when I was stressing out about a talk, Aaron Morton recommended that I read Zen Mind, Beginner’s Mind. It’s an excellent book if you’re interested in Zen of course, but one thing I took away from it is the value of seeing things with a beginner’s mind. Once we’ve acclaimated to a new environment - be it a company, home, city, or vehicle - we are less likely to notice things that are obvious to beginners. I took my notes and data spanning git logs, email, Jira, and even my shell history to create a document with all the things I noticed that were good and those that needed improvement. I chose to keep things as constructive and positive as I could.

Observations:

  • Pointed out some technical debt, noting that it was not bad and totally fixable.
  • Wrote a quick review of the state of our Ansible repos and procedures.
  • Noted some good patterns I noticed in our AWS setup, particularly that we were leveraging IAM and VPC quite well for being relatively new to cloud ops.
  • Included a detailed review of the Cassandra clusters since that’s an area of expertise for me.
  • Pointed out gaps in operational tooling that we should focus on.
  • Gushed about how I saw the company’s stated culture show up in my interactions with people as I onboarded.
  • Wrote a bit about my experience with our product and threw out my BHAG for it.
  • Recommended improvements for gear & provisioning specific to technical staff.
  • Called out the need to simplify our edge architecture (under way!).
  • Talked briefly about my orientation experience and recommended some changes for engineering hires.
  • Linked some research about IT procedures that needed to updated.
  • Celebrated that folks were using my name and pronouns consistently.
  • Offered to advise IT folks on some improvements to laptop deploys.

I wrote the doc with my manager, their manager, and my peers in mind. The last I heard it was being passed around the C-levels with positive remarks. Even though I resolved some blockers and deployed a significant upgrade, this document was by far my largest contribution to date. The people I joined were used to their environment and by way of keeping some notes and adding some narrative, I was able to reach a large chunk of the management team and have an impact that benefitted the whole organization.

Wrapup

Starting a new job is stressful regardless of your role. For those of us working in operations and site reliability, the tech work is usually the easy part. Getting acclaimated into the social fabric and pacing yourself for the long haul is something I think we all struggle with. By being methodical and mindful about your approach to your first few weeks, it’s possible to make an impact without the usual stress of being new and vulnerable.

As with any tips of this sort, your experience may vary. Some things that worked for me may also work for you. Above all, find what works for you, make a plan, and communicate, communicate, communicate.

December 7, 2017

Day 7 - Running InSpec as a Push Job…or…The Nightmare Before Christmas

By: Annie Hedgepeth (@anniehedgie) Edited By: Jan Ivar Beddari (@beddari)

sys-advent-title

Bored with his Halloween routine, Jack Skellington longs to spread Christmas joy, but his antics put Santa and the holiday in jeopardy! - Disney

jack

I feel a kindred spirit with Jack Skellington. I, too, wanted to spread some holiday-InSpec joy with my client, but the antics of their air-gapped environment almost put InSpec and my holiday joy in jeopardy. All my client wanted for Christmas was to be able to run my InSpec profile in the Jenkins pipeline to validate configuration of their nodes, and I was eager to give that to them.

Sit back and let me tell the holiday tale of how I had no other choice but to use Chef push jobs to run InSpec in an air-gapped environment and why it almost ruined Christmas.

Nothing would have brought me more holiday cheer than to be able to run run the tests as a winrm or ssh command from the Jenkins server directly from a profile in a git repository, not checked out. However, my soul sank as I uncovered reason after reason for the lack of joy for the season:

Scroogey Problems:

  1. Network Connectivity: The nodes are in an air-gapped environment, and we needed InSpec to run every time a node was added.
  2. Jumpbox Not an Option: I could have PowerShell remoted into the jumpbox and run my InSpec command remotely, but this was, again, not an option for me. You see, my InSpec profile required an attributes file. An attribute is a specific detail about a node, so I had to create an attributes file for my InSpec profile by using a template resource in the Chef cookbook. This is because I needed node attributes and data-bag information for my tests that were specific to that particular Chef environment.
  3. SSL Verification: There is an SSL error when trying to access the git repo in order to run the InSpec profile remotely. Chef is working on a feature to disable SSL verification. When that is ready, we can access InSpec via a git link but not now.

Because we were already using push jobs for other tasks, I finally succumbed to the idea that I would need to run my InSpec profiles as ::sigh:: push jobs.

Let me tell you real quickly what a push job is. Basically, you run a cookbook on your node that allows you to push a job from the Chef server onto your node. When you run the push jobs cookbook, you define that job with a simple name like “inspec” and what it does, for example: inspec exec .. Then you run that job with a knife command, like knife job start inspec mynodename.

Easy, right? Don’t get so cheery yet.

This was the high level of what would have to happen, or what you might call the top-of-the-Christmas-tree view:

  1. The InSpec profile is updated.
  2. The InSpec profile is zipped up into a .tar.gz file using inspec archive [path] and placed in the files/default folder of a wrapper cookbook to the cookbook that we were testing. The good thing about using the archive command is that it versions your profile in the file name.
  3. The wrapper cookbook with the new version of the zipped up InSpec profile is uploaded to the Chef server.
  4. Jenkins runs the wrapper cookbook as a push job when a new node is added, and the zipped up InSpec profile is added to the node using Chef’s file resource.
  5. During the cookbook run, an attributes file is created from a template file for the InSpec profile to consume. The push jobs cookbook has a whitelist attribute to which you add your push job. You’re just telling Chef that it’s okay to run this job. Because my InSpec command was different each time due to the version of the InSpec profile, I had to create basically make the command into a variable, so that meant I had to nest my attributes, which looks like this:
    node['push_jobs']['whitelist'] = {
     'chef-client' => 'chef-client',
     'inspec' => node['mycookbook']['inspec_command']
    }

    The inspec_command attribute was defined like like this (more nesting):

    "C:/opscode/chef/embedded/bin/inspec exec #{Chef::Config[:file_cache_path]}/cookbooks/mycookbook/files/default/mycookbook-inspec-#{default['mycookbook']['inspec_profile_version']}.tar.gz --attrs #{default['mycookbook']['inspec_attributes_path']}"
  6. Another Jenkins stage is added that runs the “inspec” push job.

And all of that needs to be automated so that it actually stays updated. Yay…

I will not get into the details of automating this process, but here is the basic idea. It is necessary to leverage a build that is kicked off in Jenkins by a pull request made in git. That build, which is a Jenksinsfile in my InSpec profile, does this: - archives the profile after it merges into master - checks out the wrapper cookbook and creates a branch - adds to new version of the profile to the files/default directory - updates the InSpec profile version number in the attributes file - makes a pull request to the wrapper cookbook’s master branch that also has a pull request build which ensures that Test Kitchen passes before it is merged

easy

So…this works, but it’s not fun at all. It’s definitely the Nightmare Before Christmas and the Grinch Who Stole Christmas wrapped up into one. It takes a few plugins in both Jenkins and BitBucket, which can be difficult to pull off if you don’t have admin rights. I used this blog post as a reference.

I battled internally with a simpler way to do this. A couple of nice alternatives could have been Saltstack and Chef Automate, but neither of those were an option for me. I’m not familiar with Saltstack, but I’m told that its remote execution feature would be able to run InSpec in an air-gapped environment. Likewise, Chef Automate has the Chef Compliance feature which runs all of your InSpec profiles from the Compliance server that you can put in your network. I’m still on the fence about whether those would have been easier to implement, though, because of the heavy dependence I had on the node attributes and data-bags that are stored on the Chef server.

As ugly as this process is, every time I see those all successful test results displayed in the Jenkins output, I can’t help but put a big ol' jolly smile on my face. Sure, it super sucks to jump through all these hoops to get InSpec to work in this environment, but it when the automation works, it just works and no one knows what I had to go through to get it there. It’s like a Christmas miracle.

tada

Do I recommend doing it this way if you don’t have to? No. Is this a great workaround if you have no other way to validate your configuration? Absolutely.

And if you need further convincing of the Christmas magic of InSpec, be sure to read my post last year about how InSpec builds empathy across organizations.

I hope you enjoyed my post! Many special thanks to Jan Ivar Beddari for editing this post and to Chris Webber for organizing this very merry blog for all of us! You can follow me on Twitter @anniehedgie. If you’d like to read more about InSpec, I wrote a whole tutorial series for you to follow here. And if you’d like me and my team at 10th Magnitude to help you out with all things Azure, give us a shout!

December 6, 2017

Day 6 - sysadmins - the evolution of a role amidst revolutionary hype.

By: Robert Treat (@robtreat2)

Edited By: Daniel “phrawzty” Maher (@phrawzty)

Like so many things in our industry, our job titles have become victims of the never-ending hype cycle. While the ideas behind terms like “DevOps” or “Site Reliability Engineering” are certainly valid, over time the ideas get lost and the terms become little more than buzzwords, amplified by a recruiting industry more concerned about their own short-term paychecks than our long-term career journeys. As jobs and workers are rebranded as DevOps and SREs, many Ssysadmins are left wondering if they are being left behind. Add in a heavy dose of the cloud, and a sysadmin has to wonder whether they will have a job in a few years. The good news is that despite all the noise, the need for sysadmins has never been stronger, you just need to see the connections between the technology you grew up on, and the technology that is going to move us forward in the next several years.

It used to be that when you started a new project you first had to determine what hardware to use, both from a physical standpoint but also from a pricing standpoint. In the cloud, these concerns are still there but have shifted. While most people in the cloud no longer worry about sizing infrastructure correctly at the start of a project, the tradeoff of being able to re-size VMs with relative ease is that it is also easy to oversize your instances, and in the cloud oversize means overspend, all day every day; at some point you need to work out the math to determine what your growth curve looks like in terms of resource needs vs dollars spent. Ever made that joke about having to bust out the slide rule to run cost comparisons between Riverbed, NetApp, and LSI? As much as they try, the cloud hasn’t made IOPS go away. Helping set estimates on how many IOPS an application will consume still requires a bit of maths, only now you also need to know your way around EBS and SSDs vs Provisioned IOPS in order to determine a reasonable IOPS per dollar ratio. But hey, you’ve done that before.

And that’s the thing; there are many skills which transfer like that. Scared about the new world of microservices? Don’t be - you were dealing with microservice like architectures long before the rest of us had even heard of the term. At it’s core, microservices are just a collection of loosely coupled services designed to meet some set of business goals. While we have not traditionally built and run applications that way, the mental leap for a sysadmin familiar with managing machines running Apache, Sendmail, OpenLDAP, and Squid is much less than for a developer who has only ever dealt with building complex monolithic applications. As sysadmins, we don’t think twice about individual services running on different ports, speaking different protocols, and providing completely different methods for observing their behavior; that’s just the way it is. Compare that to a development community that has wasted a generation trying to build ORMs to abstract away the concept of data storage rather than just learning to talk to another service in its own language.

This isn’t to say you can rest on your laurels. The field of Web Operations and the software that powers it is constantly changing, so you need to develop the ability to take what you already know and apply it to new software and systems. It is worth pointing out that this won’t always be easy or clean; new technology often misrepresents itself. For example, the rise of tools like Chef and Docker left many sysadmins wondering which direction to turn, but if you study these tools for a bit, you see that they draw similar patterns to old techniques. It can certainly be difficult for folks who have spent years coding on the command line to grok the syntax of a configuration management tools DSL, but you can certainly understand why companies want to automate systems; the idea of replacing manual labor with something automated is something we print on t-shirts just for fun. And sure, I understand how the yarn ball of recipes, resources, and roles might look like overkill to a lot of people, but I’ve also seen some crazy complex mixes of bash and Perl used as startup scripts during a PXE boot, so it’s all relative.

When Docker first came on the scene, it also promised to revolutionize everything we know about managing systems. All the hype around containers seemed to focus on resource management and security, but the reality was mostly just a new way to package and distribute software, whereby new I mostly just mean different. I’ve often lamented that something is lost when an operator never learns how to compile code or bypasses the experience of packaging other people’s software. The promise of Docker is that you can put together systems like using a set of legos using pre-existing pieces, but stray from the well trodden path even a little and you’ll find all of those magic compile time errors and strange library dependencies that you are familiar with from systems in the past. Like any system built on abstractions, there are assumptions (and therefore dependencies) baked in three levels deep. If you ever debated whether to rewrite an rpm spec file from scratch after a half day hacking on the distro’s spec file trying to add in the one module you need the maintainers didn't… replace rpm spec file with dockerfile and you have someone to share root beers with. Sure the container magic is magic when it works, but the devil is in the dependencies.

Of course no conversation about the role of the sysadmin would be complete without touching on the topics of networks and security. While sometimes made the purview of dedicated personnel, at some level these two areas always seem to fall back to the operations team. Understanding the different networks within your organization, the boundaries between those networks, and the who or how to traverse them has always been a part of life as a sysadmin. Unfortunately in what should be one of the most directly applicable skillsets (networks are still networks), the current situation in cloud land has actually gotten worse; the stakes are fundamentally higher in a world where the public internet is always just a mis-configuration away. Incorrect permissions on a network file share might expose sensitive material to everyone in the company, but incorrect permissions in S3 expose those files to the world. Networking is also more complicated in the cloud world. I’ve always been pretty impressed by how far one could get with VPNs and SSH when building your own, but with cloud providers focused on attracting enterprise clients in regulated industry, you’ll have to learn new tooling built to meet those needs, for better or worse. It can still be done, just be aware it is going to work a little differently.

So the good news is that the role of the sysadmin isn’t going away. While the specifics may have changed, resource management, automation, packaging, network management, security, rapid response, and all the other parts of the sysadmin ethos remain critical skills that companies will need going forward. Unfortunately that doesn’t solve the problem of companies thinking they need to hire more “DevOps Developers” (though I never see jobs for “DevOps Operators” - go figure!) and other such crazy things. As I see it, it is easy to make fun of companies who want to hire DevOps engineers because they don’t understand DevOps, but you can also look at it like hiring a network engineer or security engineer - believing you need someone who specializes in automation (and likely CM or CI/CD specifically) is not necessarily a bad thing. So the next time you’re feeling lost or wondering where your next journey may take you, remember that if you focus on the principles of running systems reliably and keep your learning focused on fundamental computing skills, even though the tools may change the problems are fundamentally the same.

December 5, 2017

Day 5 - Do you want to build a helm chart?

By: Paul Czarkowski (@pczarkowski)

Edited By: Paul Stack (@stack72)

Kubernetes Kubernetes Kubernetes is the new Docker Docker Docker

“Kubernetes is an open-source system for automating deployment, scaling, and management of containerized applications.”

– https://kubernetes.io

Remember way back in 2015 when all anybody would talk about was Docker even though nobody actually knew what it was or what to do with it? That’s where Kubernetes is right now. Before we get into Helm charts, a quick primer on Kubernetes is a good idea.

Kubernetes provides scheduling and management for your containerized applications as well as the networking and other necessary plumbing and surfaces its resources to the developer in the form of declarative manifests written in YAML or JSON.

A Pod is the smallest deployable unit that can be deployed with Kubernetes. It contains one or more collocated containers that share the same [internal] IP address. Generally a pod is just a single container, but if your application requires a sidecar container to share the same IP or a shared volume then you would declare multiple containers in the same pod.

A Pod is unmanaged and will not be recreated if the process inside the container ends. Kubernetes has a number of resources that build upon a pod to provide different types of lifecycle management such as a Deployment that will ensure the correct number of replicas of your Pod are running.

A Service provides a stable name, IP address, and DNS (if KubeDNS is enabled) across a number of pods and acts as a basic load balancer. This allows pods to easily communicate to each other and can also provide a way for Kubernetes to expose your pod externally.

Helm is a Package Manager for Kubernetes. It doesn’t package the containers (or Pods) directly but instead packages the kubernetes manifests used to build those Pods. It also provides a templating engine that allows you to deploy your application in a number of different scenarios and configurations.

[Helm] Charts are easy to create, version, share, and publish — so start using Helm and stop the copy-and-paste madness. – https://helm.sh/

Let’s Build a Helm Chart!

In order to follow along with this tutorial you will need to install the following:

If you are on a Mac you should be able to use the following to install the necessary bits:

$ brew cask install minikube
$ brew install kubernetes-helm

If you already have a Kubernetes manifest its very easy to turn it into a Helm Chart that you can then iterate over and improve as you need to add more flexibility to it. In fact your first iteration of a Helm chart can be your existing manifests tied together with a simple Chart.yaml file.

Prepare Environment

Bring up a test Kubernetes environment using Minikube:

$ minikube start
Starting local Kubernetes v1.7.5 cluster...
Starting VM...
Getting VM IP address...
Moving files into cluster...
Setting up certs...
Connecting to cluster...
Setting up kubeconfig...
Starting cluster components...
Kubectl is now configured to use the cluster.

Wait a minute or so and then install Helm’s tiller service to Kubernetes:

$ helm init
$HELM_HOME has been configured at /home/XXXX/.helm.

Tiller (the Helm server-side component) has been installed into your Kubernetes Cluster.
Happy Helming!

If it fails out you may need to wait a few more minutes for minikube to become accessible.

Create a path to work in:

$ mkdir -p ~/development/my-first-helm-chart

$ cd ~/development/my-first-helm-chart

Create Example Kubernetes Manifest.

Writing a Helm Chart is easier when you’re starting with an existing set of Kubernetes manifests. One of the easiest ways to get a basic working manifest is to ask Kubernetes to run something and output the resultant manifest to a file.

Run a basic nginx Deployment and expose it via a NodePort Service:

$ mkdir -p templates

$ kubectl run example --image=nginx:alpine \
    -o yaml > templates/deployment.yaml
    
$ kubectl expose deployment example --port=80 --type=NodePort \
    -o yaml > templates/service.yaml

Minikube has some helper functions to let you easily find the URL of your service. run curl against your service to ensure that its running as expected:

$ minikube service example --url
http://192.168.99.100:30254

$ curl $(minikube service example --url)
...
<title>Welcome to nginx!</title>
...

You’ll see you now have two Kubernetes manifests saved. We can use these to bootstrap our helm charts:

$ tree
└── templates
    ├── deployment.yaml
    └── service.yaml

Explore the deployment.yaml file in a text editor. Following is an abbreviated version of it with comments to help you understand what some of the sections mean:

# These first two lines appear in every Kubernetes manifest and provide
# a way to declare the type of resource and the version of the API to
# interact with.
apiVersion: apps/v1beta1
kind: Deployment
# under metadata you set the resource's name and can assign labels to it
# these labels can be used to tie resources together. In the service.yaml
# file you'll see it refers back to this `run: example` label.
metadata:
  labels:
    run: example
  name: example
# how many replicas of the declared pod should I run ?
spec:
  replicas: 1
  selector:
    matchLabels:
      run: example
# the Pod that the Deployment will manage the lifecycle of.
# You can see once again the use of the label and the containers
# to run as part of the pod.
  template:
    metadata:
      labels:
        run: example
    spec:
      containers:
      - image: nginx:alpine
        imagePullPolicy: IfNotPresent
        name: example

Explore the service.yaml file in a text editor. Following is an abbreviated version of it:

apiVersion: v1
kind: Service
metadata:
  labels:
    run: example
  name: example
spec:
# The clusterIP is the IP address that other nodes can use to access the pods
# Since we didn't specify and IP Kubernetes picked one for us.
  clusterIP: 10.0.0.62
# The Port mappings for the service.
  ports:
  - nodePort: 32587
    port: 80
    protocol: TCP
    targetPort: 80
# Any pods that have this label will be exposed by this service.    
  selector:
    run: example
# All Kubernetes worker nodes will expose this service to the outside world
# on the port specified above as `nodePort`.
  type: NodePort

Delete the resources you just created so that you can move on to creating the Helm Chart:

$ kubectl delete service,deployment example
service "example" deleted
deployment "example" deleted

Create and Deploy a Basic Helm Chart

The minimum set of things needed for a valid helm chart is a set of templates (which we just created) and a Chart.yaml file which we need to create.

Copy and paste the following into your text editor of choice and save it as Chart.yaml:

Note: the file should be capitalized as shown above in order for Helm to use it correctly.

apiVersion: v1
description: My First Helm Chart
name: my-first-helm-chart
version: 0.1.0

We now have the the most basic Helm Chart possible:

$ tree
.
├── Chart.yaml
└── templates
    ├── deployment.yaml
    └── service.yaml

Next you should be able to install this helm chart giving it a release name of first and using the current directory as the source of the Helm Chart:

$ helm install -n example .
NAME:   example
LAST DEPLOYED: Wed Nov 22 10:55:11 2017
NAMESPACE: default
STATUS: DEPLOYED

RESOURCES:
==> v1beta1/Deployment
NAME     DESIRED  CURRENT  UP-TO-DATE  AVAILABLE  AGE
example  1        1        1           0          1s

==> v1/Service
NAME     CLUSTER-IP  EXTERNAL-IP  PORT(S)       AGE
example  10.0.0.62   <nodes>      80:32587/TCP  1s

Just as you did earlier you can use minikube to get the URL:

$ curl $(minikube service example --url)
...
<title>Welcome to nginx!</title>

Congratulations! You’ve just created and deployed your first Helm chart. However its a little bit basic, the next step is to add some templating to the manifests and update the deployment.

Add variables to your Helm Chart

In order to render templates you need a set of variables. Helm charts can come with a values.yaml file which declares a set of variables and their default values that can be used in your templates. Create a values.yaml file that looks like this:

replicaCount: 2
image: "nginx:alpine"

These values can be accessed in the templates using the golang templating engine. For example the value replicaCount would be written as {{ .Values.replicaCount }}. Helm also provides information about the Chart and Release that can be handy to utilize.

Update your templates/deployment.yaml to utilize our values:

apiVersion: apps/v1beta1
kind: Deployment
metadata:
  labels:
    run: "{{ .Release.Name }}"
    chart: "{{ .Chart.Name }}-{{ .Chart.Version }}"
    release: "{{ .Release.Name }}"
  name: "{{ .Release.Name }}"
  namespace: default
spec:
  replicas: {{ .Values.replicaCount }}
  selector:
    matchLabels:
      run: "{{ .Release.Name }}"
  template:
    metadata:
      labels:
        run: "{{ .Release.Name }}"
    spec:
      containers:
      - image: "{{ .Values.image }}"
        name: "{{ .Release.Name }}"

Edit your templates/service.yaml to look like:

apiVersion: v1
kind: Service
metadata:
  name: "{{ .Release.Name }}"
  labels:
    run: "{{ .Release.Name }}"
    chart: "{{ .Chart.Name }}-{{ .Chart.Version }}"
    release: "{{ .Release.Name }}"
spec:
  ports:
  - port: 80
    protocol: TCP
    targetPort: 80
  selector:
    run: "{{ .Release.Name }}"
  type: NodePort

Once your files are written out you should be able to update your deployment:

$ helm upgrade example .
Release "example" has been upgraded. Happy Helming!
LAST DEPLOYED: Wed Nov 22 11:12:25 2017
NAMESPACE: default
STATUS: DEPLOYED

RESOURCES:
==> v1/Service
NAME     CLUSTER-IP  EXTERNAL-IP  PORT(S)       AGE
example  10.0.0.79   <nodes>      80:31664/TCP  14s

==> v1beta1/Deployment
NAME     DESIRED  CURRENT  UP-TO-DATE  AVAILABLE  AGE
example  2        2        2           2          14s

You’ll notice that your Deployment now shows as having two replicas of your pod demonstrating that the replicas value provided has been applied:

$ kubectl get deployments
NAME      DESIRED   CURRENT   UP-TO-DATE   AVAILABLE   AGE
example   2         2         2            2           2m

$ kubectl get pods       
NAME                       READY     STATUS    RESTARTS   AGE
example-5c794cbb55-cvn4k   1/1       Running   0          2m
example-5c794cbb55-dc7gf   1/1       Running   0          2m

$ curl $(minikube service example --url)
...
<title>Welcome to nginx!</title>

You can override values on the command line when you install (or upgrade) a Release of your Helm Chart. Create a new release of your helm chart setting the image to apache instead of nginx:

$ helm install -n apache . --set image=httpd:alpine --set replicaCount=3
NAME:   apache
LAST DEPLOYED: Wed Nov 22 11:20:06 2017
NAMESPACE: default
STATUS: DEPLOYED

RESOURCES:
==> v1beta1/Deployment
NAME    DESIRED  CURRENT  UP-TO-DATE  AVAILABLE  AGE
apache  3        3        3           0          0s

==> v1/Service
NAME    CLUSTER-IP  EXTERNAL-IP  PORT(S)       AGE
apache  10.0.0.220  <nodes>      80:30841/TCP  0s

Kubernetes will now show two sets of Deployments and Services and their corresponding pods:

$ kubectl get svc,deployment,pod                                        
NAME             TYPE        CLUSTER-IP   EXTERNAL-IP   PORT(S)        AGE
svc/apache       NodePort    10.0.0.220   <none>        80:30841/TCP   1m
svc/example      NodePort    10.0.0.79    <none>        80:31664/TCP   8m
svc/kubernetes   ClusterIP   10.0.0.1     <none>        443/TCP        58m

NAME             DESIRED   CURRENT   UP-TO-DATE   AVAILABLE   AGE
deploy/apache    3         3         3            3           1m
deploy/example   2         2         2            2           8m

NAME                          READY     STATUS    RESTARTS   AGE
po/apache-5dc6dcd8b5-2xmpn    1/1       Running   0          1m
po/apache-5dc6dcd8b5-4kkt7    1/1       Running   0          1m
po/apache-5dc6dcd8b5-d2pvt    1/1       Running   0          1m
po/example-5c794cbb55-cvn4k   1/1       Running   0          8m
po/example-5c794cbb55-dc7gf   1/1       Running   0          8m

By templating the manifests earlier to use the Helm release name in the labels for the Kubernetes resources the Services for each release will only talk to its corresponding Deployments:

$ curl $(minikube service example --url)
...
<title>Welcome to nginx!</title>

$ curl $(minikube service apache --url)
<html><body><h1>It works!</h1></body></html>

Clean Up

Delete your helm deployments:

$ helm delete example --purge          
release "example" deleted

$ helm delete apache --purge          
release "apache" deleted

$ minikube delete
Deleting local Kubernetes cluster...
Machine deleted.

Summary

Congratulations you have deployed a Kubernetes cluster on your laptop using minikube and deployed a basic application to Kubernetes by creating a Deployment and a Service. You have also built your very first Helm chart and used the Helm templating engine to deploy different versions of the application.

Helm is a very powerful way to package up your Kubernetes manifests to make them extensible and portable. While it is quite complicated its fairly easy to get started with it and if you’re like me you’ll find yourself replacing the Kubernetes manifests in your code repos with Helm Charts.

There’s a lot more you can do with Helm, we’ve just scratched the surface. Enjoy using and learning more about them!

December 4, 2017

Day 4 - This Christmas, build your own PKI

By: Patrick Cable (@patcable) Edited By: Gareth Rushgrove (@garetr)

Imagine that you’re working Pettr, the next generation Twitter for Pets. You’ve launched, pets are tweeting at least two times more often, so your growth is through the roof. What an exciting time for you! Now that the platform is off the ground, you’ve noticed a couple areas for improvement:

  1. The security of the control plane leaves a lot to be desired. Users have tons of SSH keys, some protected, some not.
  2. TLS between a lot of our internal services wasn’t ever set up.

You’ve decided to attack both of these issues over the next few months. Where could you begin? Well, one place you could start is by creating an internal Public Key Infrastructure, or PKI. PKIs are a way to make trust “happen” between two servers or two people. Wouldn’t it be nice if you could ensure your SSH or VPN access keys were on a physical token? Also, it’d be great if you could generate short term certificates for service communication. Well, great news for you: PKIs will get you where you gotta go.

Understanding Keys and Certificates and Authorities (oh my!)

There are many ways to secure communications between two different machines (or people). It’s the job of a cryptographer to create protocols and algorithms to do things like establish trust and identity. TLS, for example, is one of the protocols that secures most of the communications on the Internet. You might have heard it referred to as SSL as well - and that’s okay too, it refers to an earlier version of protocol. It’s what makes https work.

For you to access a site over HTTPS, the operator had to generate a private key and certificate signing request (CSR) for that private key. This CSR contains a few bits of information:

  1. The public component of the private key
  2. The hostname of the server it will protect
  3. Data about the operating organization

The certificate request is sent to a trusted third party called a Certificate Authority. That CA then issues you a certificate.
certchain-example

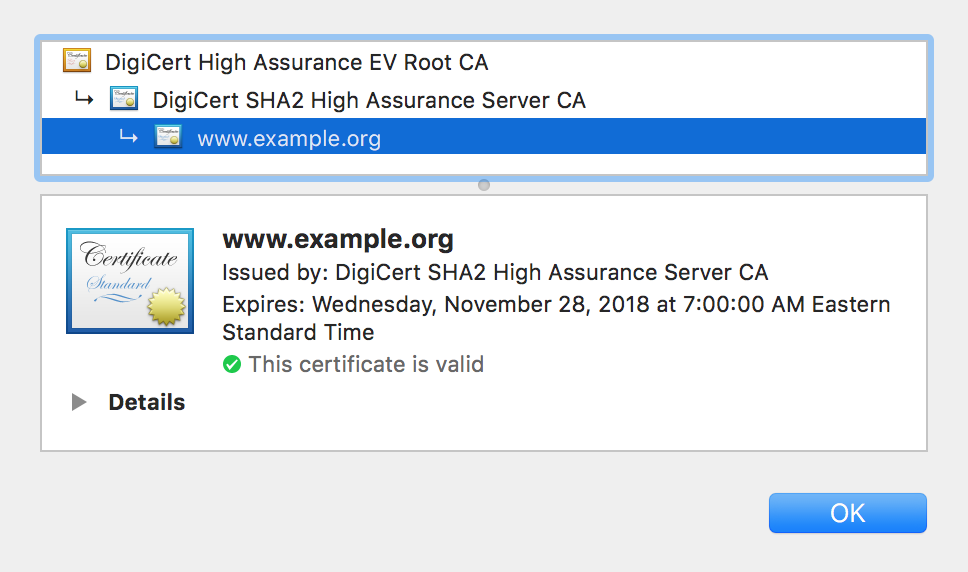
Let’s look at an example certificate chain. If you open https://example.org, the server will send its certificate (example.org) and intermediate (DigiCert SHA2 High Assurance Server CA). Our browser shipped with the public key of the Root Certificate Authority (DigiCert High Assurance EV Root CA), so it is able to validate the whole chain. Now both ends of the connection will negotiate a session key and begin communicating securely on the Internet.

Root CAs? In MY browser?

You know that browsers ship with a set of Certificate Authorities. But how did they get there to begin with?

A Root CA that is recognized by web browsers has played by the rules specified by an organization called the CA/Browser Forum. Certificate Authorities are incentivized to play by the rules because for many, issuing certificates is what these organizations do. They would like to continue doing that. The penalty for not playing by the rules is that browsers will stop including their Root CA certificate.

A Root CA is a private key and a self-signed certificate that has some options set and generally has a long lifetime. It is protected carefully (many of the controls are physical), and generally key operations with it are performed on separate machines disconnected from the Internet. This means with some careful planning you could have your very own root CA that is trusted within your infrastructure to provide secure communications and identity.

You’ll still need to provide external endpoints with externally issued CA certificates. Otherwise, your users will get browser errors when they visit your site. But your internal communication and identity verification tools can use your CA to as a root of trust to identify users and servers.

Danger: High Voltage

PKIs sound great, and they will help you out significantly with your security project. However, security technologies often involve tradeoffs, and this is no different.

One of the biggest risks is the loss of the private key of the Root CA for your PKI. If the private key of the CA is stolen, someone could issue new certificates that your infrastructure would trust because of their origin. This sounds like something that should never happen - and you would be correct. This has happened before to much larger certificate authorities with much larger implications than your CA.

This article is going to outline a way that creating a PKI can work for smaller organizations. As you grow some of these processes may need refinement. For one, you’ll be using certificate revocation lists (CRLs). The newer Online Certificate Status Protocol (OCSP) can verify all issued and revoked certificates. This is better for validation, but requires additional infrastructure. Second, provisioning users is a manual process. Not all users need VPN or SSH access. If you provide a lot of folks with this access, you’ll need automation and an online system that can issue the certificates.

Physical Security Matters

To begin, you’ll need to have a few bits of infrastructure in place to securely generate keys - especially the ones needed for our Root CA.

Key Operations Computer

First, you’ll want a separate computer that does not connect to the internet and boots off of fresh read-only material each time. While it is possible for you to create certificates on any computer, you shouldn’t. Keeping this task limited to a separate machine reduces the risk of a malware infection leading to key exfiltration. Key material should live on an external encrypted drive. You’re booting off of read-only media to begin with, so you can’t keep it on the computer.

This article will focus specifically on using Linux tools to generate and place certificates. Windows does have some CA functionality built into it - but the security considerations differ a little bit there.

Creating a LiveCD

Many Linux distributions allow you to customize a LiveCD. This does mean you have to trust the distribution vendor’s base install, but we’ve got to start somewhere. You can limit the “blast radius” of this by using the smallest default install you can, and customizing the rest.

You’ll need the following tools on your LiveCD:

  • Utilities for talking to YubiKeys (pcscd, yubico-piv-tool)
  • CFSSL, the CloudFlare PKI Toolkit which is a little easier to use than OpenSSL
  • jq, a command line JSON parser

Storage and Backup

You’ll want an encrypted flash drive to store key material on, and a procedure for backing that key material up. A loss of the key material means you’ll have to go through all this again.

For now, make a plan on how you want to protect this. You’ll want a safe, or a safe deposit box, or a lawyer to store all key material with. Maybe you store the backup in a safe deposit box or with your lawyer. If you buy a safe, make sure the safe is not something that you could easily move — otherwise someone could take the whole thing.

An online place to store key material

If we’re going to actually use this PKI, you’ll need something to issue certificates. Vault is a good candidate here, and will also maintain a list of revoked/expired certificates that you’ll use as a Certificate Revocation List. This article will make heavy use of Vault, so you’ll need it (or something like it) set up.

Generate your CA

Now that you have the physical security prerequisites out of the way, you can begin generating the CA certificates. We’re going to create a Root CA with a 10 year life, and intermediate CAs that are signed by that root with a 5 year life.

Intermediate CAs help us protect the root. In the event of a compromise of an intermediate, it is easier to generate a new intermediate CA than a new root.

Make a directory called config and ca to begin.

Create config/ca-csr.json:

  {
    "CN": "Pettr Root CA",
    "key": {
      "algo": "ecdsa",
      "size": "384"
    },
    "names": [
      {
        "C": "US",
        "ST": "Massachusetts",
        "L": "Boston",
        "O": "Pettr, LLC."
      }
    ]
  }

The CN is how your CA will appear in a certificate chain. The settings for key (algo and size) determine the encryption key algorithm and length. If you control the entire infrastructure, you can set this to something modern (like ecdsa and 384). If your root CA may be installed on devices that aren’t running something modern (printers, routers) then you may want to use to rsa and 2048. The most important part, regardless of key length, is that the private key for your CA stays off-line and protected.

Build the CA using cfssl gencert -initca ca-csr.json | cfssljson -bare ca/ca. All of cfssl output is in JSON, so cfssljson will write it out to ca.pem and ca-key.pem. You’ll need to add some attributes to the certificate that can’t be added to the initial request. These attributes include the usages for this certificate, and also the crl_url.

Create config/ca-sign.json:

  {
    "signing": {
      "default": {
        "expiry": "87600h",
        "usages": ["cert sign", "crl sign"],
        "ca_constraint": {
          "is_ca": true,
          "max_path_len": 1,
          "max_path_len_zero": false
        },
        crl_url": "https://pettr.example.com/ca.crl"
      }
    }
  }

Now you’ll need to run:

  1. cfssl sign -ca ca/ca.pem -ca-key ca/ca-key.pem -config config/ca-sign.json ca/ca.csr | cfssljson -bare ca/ca to generate the new certificate
  2. cfssl gencrl ca/revoked-certs ca/ca.pem ca/ca-key.pem 31540000 | base64 -d > ca/ca.csr to generate a CRL good for a year

Now you have a CA that can generate intermediate CAs! Make sure you copy the ca/ca.pem file - that’s the CA’s public key. You’ll need to put ca.crl at the URL you specified for crl_url.

You’ll want to make two empty files as well: ca/issued-certs and ca/revoked-certs. You’ll use these to track the certificates you issue off the CA.

Generate Intermediate CAs

We’re going to make an intermediate CA for our Development, Testing, and Production environments. You’ll also make one for certificates that identify a particular user (you can call it users). Separating machine trust (services talking to each other) and user trust (identifying people) helps us not redefine users across all environments.

Create a CSR request, and a signing request. You’ll repeat this for each environment you want to build an intermediate for.

Create config/int-csr-dev.json:

  {
    "CN": "Pettr DEV CA-1",
    "key": {
      "algo": "ecdsa",
      "size": 384
    },
    "names": [
      {
        "C": "US",
        "L": "Boston",
        "O": "Pettr, LLC",
        "ST": "Massachusetts"
      }
    ],
    "ca": {
      "expiry": "35040h"
    }
  }

Create config/int-sign-dev.json:

  {
   "signing": {
      "default": {
        "usages": [ "cert sign", "crl sign" ],
        "expiry": "35040h",
        "ca_constraint": {
          "is_ca": true,
          "max_path_len": 0,
          "max_path_len_zero": true
        },
        "crl_url": "https://vault.pettr.example.com:8200/v1/pki/crl"
      }
    }
  }

You’ll notice that we set the URL to Vault’s PKI CRL endpoint. For your users CA, you would point this to somewhere perhaps alongside where you store your CA CRL.

Generate your intermediates. This guide will show this process for the dev environment, but you’ll repeat this for each intermediate, replacing filenames and comments as needed:

  1. Make a folder for the intermediate - mkdir dev
  2. Make the certificate cfssl gencert -initca config/int-csr-dev.json | cfssljson -bare dev/dev
  3. Sign and replace the certificate with extra options: cfssl sign -ca ca/ca.pem -ca-key ca/ca-key.pem -config config/int-sign-dev.json dev/dev.csr | cfssljson -bare dev/dev
  4. Record the issuance in your issued-certs file: echo "$(cfssl certinfo -cert dev/dev.pem | jq .serial_number | tr -d '"') # DEV CA" >> ca/issued-certs.

Now we’re done making intermediates. You’ll need to copy these keys and certificates to a machine that can access Vault. Hold off on copying the Users CA - keep that on the laptop. You’ll use that for provisioning YubiKeys (discussed later in this document).

Protecting your Root

You’re done with your root certificate for a while. Store it safely, as you’ll only use it to configure new intermediate CAs. GPG Encrypt the ca directory, or store it on a separate encrypted flash drive.

Using your new PKI

So you’ve generated a PKI. What now? Well, before you do anything: you’re going to have to tell your infrastructure about your shiny new CA. I’ll cover the ways i’m familiar with, you may have to do some digging for other systems.

On Debian-flavored distributions, use your configuration management tool of choice to place your CA public key in /usr/share/ca-certificates/pettr/ca.crt. That same configuration management tool can place a pettr/ca.crt line in /etc/ca-certificates.conf. Run update-ca-certificates. This will update /etc/ssl/certs with a link to your certificate. It will also update /etc/ssl/certs/ca-certificates.crt with your certificate. This file is a default “trust store” for many applications on your system. Many distribution packages will use this file/directory to determine PKI/CA trust.

Some applications use their own trust store. For example, the JVM has it’s own trust store in $JAVA_HOME/jre/lib/security/cacerts. You can add the certificate to it by running:

keytool -import -noprompt -trustcacerts -file /usr/share/ca-certificates/pettr/ca.crt -alias PETTR-CA -keystore $JAVA_HOME/jre/lib/security/cacerts -storepass changeit

After you run this, you’ll need to restart your JVM-based application. As an aside: the CA certificate store is not storing any private keys, so it does not have a secure password. You do need to be root to change the file, though.

Make sure to distribute your CA certificate to employee machines. This is important if you plan on using your PKI to protect internal applications. Doing this will ensure that their browser does not display TLS errors when browsing internal sites. We’ve all clicked through those warnings while testing systems. Doing this normalizes bad behavior though - and what if we’re not paying attention and click through something more devious? Forcing ourselves to react to the browser TLS warning is a security win.

Your internal applications may default to using the system trust root. They also may not. You’ll need to perform some investigation to see if they use the system trust roots.

Put Intermediate CAs into Vault

A convenient way to generate short-term certificates for services involves using Vault. Vault can serve as its own CA and keep its private keys to itself. Managing this outside of Vault gives the flexibility to make new intermediate CAs that don’t need Vault.

To begin, mount the pki endpoint by running vault mount pki. Then, you’ll want to set the max-lease-ttl for your infrastructure. This sets the upper bounds on how long a certificate can last within your infrastructure. To do this, run vault mount-tune -max-lease-ttl=730h pki. This tells vault that any certificate the PKI backend generates can be valid for 1 month, at most.

To import our intermediate CA certificate and key, combine:

* The private key for the DEV intermediate CA * The public key for the DEV intermediate CA * The public key for the Root CA

You can do this using cat - cat dev-key.pem dev.pem ca.pem > bundle. Once you have that file, collapse it into one line by running sed 's/$/\\n/' FILENAME | tr -d '\n'. Insert that line into a JSON file named bundle.json:

{
    "pem_bundle": "sed output here"
}

and insert it into Vault with vault write pki/config/ca @bundle.json. Our CA is now ready for use with Vault!

To test this, you’ll need to make a role for certificate creation. This allows us to set parameters for certificate generation. You’ll want to refer to the Vault PKI documentation and API documentation for specific parameters, but here is a sample:

vault write pki/roles/tls \
    allowed_domains="dev.pettr.example.com" \
    allow_subdomains="true" max_ttl="168h" \
    client_flag="false"

This creates a role named tls which can issue certificates for HOSTNAME.dev.pettr.example.com. These certificates can be valid for up to 1 week.

Finally, let’s test. Run vault write pki/issue/tls common_name=test.dev.pettr.example.com ttl=5m. This should issue us a certificate, valid for 5 minutes, for the hostname test.dev.pettr.example.com. Take the output for certificate and put it in a file named test.pem. Then, run openssl x509 -noout -text -in test.pem. You should see information about the certificate, but of interest:

        Issuer: C=US, ST=Massachusetts, L=Boston, O=Pettr LLC.,  CN=Pettr DEV CA-1
        Validity
            Not Before: Nov 26 16:24:54 2017 GMT
            Not After : Nov 26 16:30:24 2017 GMT

Now Vault is issuing certificates signed by our intermediate CA. This means you can automate this behavior. If you use Chef and are hosted in EC2, you could build a Chef resource to authenticate to Vault using the AWS Instance Identity Document, then request a certificate.

Provision User Identity with YubiKeys

Many of you are familiar with YubiKeys. YubiKeys are hardware security tokens that can output a one-time unique code. Later versions of the device (the Neo and 4) support extra authentication methods. One of these methods, U2F can serve as a second factor for websites. These devices also support key generation and storage - like smart cards. The YubiKey can store GPG certificates, but it can also store certificates for use with NIST’s Personal Identity Verification (PIV) standard. This means you can use the YubiKey to store certificates signed by your Users intermediate CA. Then, you can use your key to authenticate your users across your infrastructure. We’re going to focus on that.

Before you begin: In October 2017, security researchers discovered a bug in code shipped by Infineon that generates RSA keys. The Infineon RSALib code is in a variety of security hardware, including the YubiKey. This bug allows an adversary that has your public key to generate the private key in a matter of weeks or days (vs. years). Since you’ll be using the key generation mechanism on the YubiKey, it is critical that you are using a newer YubiKey. Yubico is replacing affected devices for no cost. For more information check out their site.

The YubiKey Neo & 4 have four different “slots” that certificates can be stored in. You can find more information about all of this on Yubico’s website, but to summarize:

  • Slot 9A is used to authenticate a person (Logging into systems)
  • Slot 9C is used for digital signatures (Signing a document, email)
  • Slot 9D is used for key management (Encrypting files)
  • Slot 9E is for physical authentication (Unlocking a door)

You will provision certificates for our YubiKeys in slot 9A and 9D. The key/certificate pair in 9A is used to authenticate users within our infrastructure. Of note, the certificate in 9D is not used. However, having a certificate in that slot is helpful if you wish to use your YubiKey as an authentication method on a Macintosh running MacOS 10.12 or later. Setting this up is outside the scope of this post, but your Mac should ask if you’re interested in doing this when you insert a properly configured YubiKey. It can be set up manually (or turned off) using the sc_auth command as well.

Generating the Identity Certificate

These actions can be performed on the computer you used to generate our initial keys. You only need the Users intermediate CA key pair. Boot your provisioning machine and unlock your PKI media. Change into the directory where you stored the intermediate CA directories (config, dev-1, prod-1, users-1). Make a directory called users-1-reqs. Next, you’ll need to create a config file to use with CFSSL for user certificates. Create config/user-config.json:

{
    "signing": {
        "default": {
            "expiry": "17520h"
        },
        "profiles": {
            "9a": {
                "expiry": "17520h",
                "usages": [
                    "signing",
                    "client auth"
                ]
            },
            "9d": {
                "expiry": "17520h",
                "usages": [
                    "key encipherment",
                    "key agreement"
                ]
            }
        }
    }
}

This config file specifies a 2 year (17520 hours) validity for these certificates. In 2 years you’ll need to provide a new certificate for your user.

Now you’ll need to use the yubico-piv-tool to generate a key on the device, export a CSR, then sign that CSR with our Users intermediate CA. You can script this behavior. Begin by creating user-yk-init.sh:

#!/bin/bash

if [[ $1 == "" ]]; then
    echo "Usage: $0 [username]"
    echo "  Initializes the PIV app on a Yubikey"
    exit 1
fi

# The Management Key is used to configure certain PIV settings on the key.
MGMT_KEY=$(cat /dev/urandom | tr -dc '0-9' |fold -w48 | head -n1)
echo $MGMT_KEY > users-1/${1}.yubimgt

# The CHUID/CCC is a identifier for this specific YubiKey. Systems need this
# to know how to refer to the key
echo "Set new CHUID/CCC"
yubico-piv-tool -a set-chuid -a set-ccc

# The YubiKey has a Physical Unlock Key to allow reprovisioning the key if the
# user forgets the PIN. We disable this functionality, because it could allow
# an adversary that gets the key that knows the unlock code unlimited retries.
echo "Brick PUK"
yubico-piv-tool -a unblock-pin -P 000000 -N 000000

# Generate a key on the card, and a CSR for the key
yubico-piv-tool -a generate -s 9a -A RSA2048 -o yktmp
yubico-piv-tool -s 9a -S "/C=US/ST=Massachusetts/L=Boston/O=Pettr, LLC./CN=${1}/" -a verify -a request -i yktmp -o users-1-reqs/${1}.csr -P 123456

# Take the CSR and sign it using the Users CA. Capture serial and place in
# a issued-certs file for a record.
cfssl sign -config=config/user-config.json -ca=users-1/users-1.pem -ca-key=users-1/users-1-key.pem -profile=9a users-1-reqs/${1}.csr | cfssljson -bare users-1/${1}
SERIAL=$(cfssl certinfo -cert users-1/${1}.pem | jq .serial_number | tr -d '"')
echo "$SERIAL # ${1}, 9a, no-local-key" >> users-1/issued-certs

# Import the certificate into slot 9a
yubico-piv-tool -a import-certificate -s 9a -i users-1/${1}.pem

# The User needs to set an 8-digit PIN for the certificate in 9A.
echo "Set PIN on device. End user should be here for this part."
yubico-piv-tool -a change-pin -P 123456

# Lock the key
echo "Set new to ${MGMT_KEY} below (written to users-1/${1}.yubimgt)"
yubico-piv-tool -a set-mgm-key -n ${MGMT_KEY}

rm yktmp

echo "Device initialized. Identity loaded."

You can now run ./user-yk-init.sh <username> to initialize a user’s YubiKey. Make sure the user is there - they’ll need to create an 8 digit PIN to unlock the device. RSA certificates are used at the user/server certificate level because of RSA’s wide support. As more applications can validate EC certificates it may be worth switching. Of note, if the user enters this wrong 3 times the device will be reset. If you’re managing all of this, it’s handy to have yubico-piv-tool on your desktop so that you can check the amount of PIN retries a YubiKey has with yubico-piv-tool -a status.

Encryption Certificate

If you want to provision an encryption certificate to the YubiKey, you’ll want to generate and keep that certificate on the laptop, generated on the YubiKey That’s because you won’t want to lose the encryption key, in case other data is encrypted with it and you need to decrypt it sometime. This is called Key Escrow.

Create user-yk-9d-init.sh:

#!/bin/bash

if [[ $1 == "" ]]; then
    echo "Usage: $0 [username]"
    exit 1
fi

if [[ ! -f users-1/${1}.yubimgt ]]; then
    echo "The user's management key doesnt exist in users-1/${1}.yubimgt."
    echo "Has the key been provisioned with ./user-yk-init.sh?"
    exit 1
fi

echo -n "About to make 9d cert for user $1 [enter to continue]"
read JUNK

# Create a CFSSL JSON CSR for the keypair for slot 9D
cat > users-1-reqs/${1}-9d.json << __EOF
{
    "CN": "$1",
    "hosts": [
    ],
    "key": {
        "algo": "rsa",
        "size": 2048
    },
    "names": [
        {
            "C": "US",
            "ST": "Massachusetts",
            "L": "Boston",
            "O": "Pettr, LLC."
        }
    ]
}
__EOF

# Generate the keypair and write it out
cfssl gencert -config=config/user-config.json -ca=users-1/users-1.pem -ca-key=users-1/users-1-key.pem -profile=9d users-1-reqs/${1}-9d.json | cfssljson -bare users-1/${1}-9d
SERIAL=$(cfssl certinfo -cert users-1/${1}-9d.pem | jq .serial_number | tr -d '"')
echo "$SERIAL # ${1}, 9d" >> users-1/issued-certs

# Make sure that process gave us what we need
if [[ ! -f users-1/${1}-9d.pem ]]; then
    echo "The user's public certificate doesnt exist in users-1/${1}-9d.pem"
    echo "The cfssl gencert command might have failed."
    exit 1
fi
if [[ ! -f users-1/${1}-9d-key.pem ]]; then
    echo "The user's private key doesnt exist in users-1/${1}-9d-key.pem"
    echo "The cfssl gencert command might have failed."
    exit 1
fi

MGMT_KEY=$(cat users-1/${1}.yubimgt)

# Write certificates
echo "Writing privkey from users-1/${1}-9d-key.pem to slot 9d"
yubico-piv-tool -a import-key -k${MGMT_KEY} -s 9d -i users-1/${1}-9d-key.pem

echo "Writing pubcert from users-1/${1}-9d.pem to slot 9d"
yubico-piv-tool -a import-certificate -k${MGMT_KEY} -s 9d -i users-1/${1}-9d.pem

Now your YubiKey has an encryption certificate on the device.

Configuring client devices to use YubiKey certificates

Once you’ve got a YubiKey provisioned with certificates, you’ll need to configure client applications on your client endpoints to use these certificates. Client applications use a standard called PKCS11 to “talk” to YubiKeys and Smart Card-like devices.

First, you’ll need a PKCS11 library. The OpenSC library will serve this purpose and is available for multiple platforms. This library is available in Homebrew, as well under the package name opensc.

SSH

To get your YubiKey working with SSH, you’ll need to install the OpenSC library in a place that your SSH agent allows PKCS11 libraries to reside. On systems running Mac OS, this is /usr/local/lib. Note that the full library must be there; symlinks will not work. On other platforms running OpenSSH 7.4 or later, you’ll need to make sure your SSH Agent is configured accordingly (check the agent’s -P flag).

You can get the public keys from your YubiKey using ssh-keygen -D /path/to/opensc-pkcs11.so. The first line represents the output of slot 9A’s certificate. If you provisioned a certificate in slot 9D, that will show second. To use these keys, you can run ssh-add -s /path/to/opensc-pkcs11.so. You will be asked for your “PKCS11 Passphrase” - this is the 8 digit PIN you set during the provisioning process. If the PIN is correct, your SSH agent will import those keys for use with SSH sessions.

You’ll need to re-add these keys when the YubiKey enters a locked state (usually when it’s removed or powered off) - so it might be helpful to make an alias for your ssh-add command.

OpenVPN

If you use a VPN client, you can also use the OpenSC library with it as well. You’ll need to configure the server to recognize certificates issued by Users intermediate CA, and configure the client to use the OpenSC library. I’ve tested this using Viscosity on Macintosh and Windows. Point Viscosity to the appropriate PKCS11 library in the VPN profile settings, click “detect” and the yubikey certificates show up and will be used as part of the authentication process.

Wrapping up

When I was working through this process for myself I had a hard time finding information on building and maintaining a PKI. Like many security technologies, there are a lot of ways to accomplish this task and the “security” of any of them are built on tradeoffs based on your organization’s threat model. My hope is that this article gave you an idea of how you could use a PKI and what a sample one for a small organization might look like. Ultimately, it’s on you to decide what bits make sense for your infrastructure.

If you want to read about more complicated key signing and provisioning processes for a unique threat model, I recently read about the DNSSEC Root Signing Ceremony and found that interesting. Enjoy!

December 3, 2017

Day 3 - Root Cause is Plural

Written by Cody Wilbourn (@codywilbourn)
Edited by Kerim Satirli (@ksatirli)

Post-mortems are an industry standard process that happens after incidents and outages as a method of continuous learning and improvement. While the exact format varies from company to company, your post-mortem report typically addresses the Five W’s:

  • What happened?
  • Where did it happen?
  • Who was impacted by the incident?
  • When did problem and resolution events occur?
  • Why did the incident occur?

The first four questions are generally easy to answer. The question that takes the majority of the time is the why. To determine why the incident occurred requires investigative skills, critical thinking, and logical deductions. Sometimes determining the true why takes multiple incidents, as various fixes are attempted before the incident is resolved, but eventually a “root cause” is designated as the root of all the problems and the report is complete.

But if your “root cause” amounts to a single failure, you have stopped your process too soon.

Root Cause is Plural

Like the word data is plural, the phrase “root cause” should be as well. There is never a singular root cause, but instead root causes that contribute to an incident. Furthering the plant metaphor, a root came from a seed, and in order to sprout, that seed needed sufficient nutrients, water, and sunlight. Failing to recognize those nutrients, water sources, and sunlight means you prematurely stopped your learning process. There are other roots growing in your field, maybe similar to the one remediated, maybe different, but feeding off of those same needs.

A network of plant plant roots. CC-SA3.0 retrieved from https://commons.wikimedia.org/wiki/File:Cycads_root.png

This isn’t just one root, there’s an entire system of roots.

Digging into Why

Six Sigma suggests that you ask the question “Why?” five times, starting from the problem to determine the root cause. The investigative process you underwent already determined a root cause, but that singular cause is not enough.

Dig deeper. Start asking “Why?” from the root cause. This will unearth other reasons, most likely related to decisions and process that started the chain of events

A Simple Component Failure

Probably one of the easiest apparent failures to diagnose are single component failures, such as a failed hard drive. The part fails, the server goes down, recovery processes follow and the post-mortem states the root cause was “Failed component. Remediated by replacing component.”

Do not stop there. Why did the component fail? What was it that contributed to the failure?

Did the component degrade over time, because it was in service for too long?

Did the component wear out because it was operated outside of its recommended specifications? That is to say, was it stressed by pressure, temperature, orientation, or other physical variables? Was it influenced by other nearby components, such as electromagnetic interference or chemical reactions?

Was the component operated within tolerances, but had a manufacturing defect?

Did the component have a design defect that rendered it incapable to run in the publicized specifications?

For each of those questions you can ask “Why?” again. For example, if the component was operated outside of the allowed tolerances: * Why was it operated outside of specifications? * Why did the original decision making process select this component for the application?

What decisions and processes (or lack thereof) contributed to where things stand today?

This example corresponds to the Space Shuttle Challenger explosion in 1986.

Why did the Challenger explode? A single O-ring failed, causing a chain of events that ultimately led to the explosion.

Gas leak on Space Shuttle Challenger. Public Domain, retrieved from https://en.wikipedia.org/wiki/Space_Shuttle_Challenger_disaster#/media/File:STS-51-L_grey_smoke_on_SRB.jpg

Did people throw up their hands and say “this stuff happens when you shoot rockets into space?” No, they didn’t. They, through the Rogers Commission, dug deeper.

The O-ring failed due to material deformation caused by low temperatures, lower than what was projected in the engineering phase. That is to say, it was operated outside of specifications.

Despite the low temperature, the decision was made to launch. Okay, why? What information was provided for that decision, and how was it generated? Was all of the known information available? Why not? What processes around decision-making allowed that go/no-go decision?

Starting with just that initial root cause of an O-ring failure, the Rogers Commission was able to generate a report that resulted in 9 actions for improvement.

If you stopped at “the part failed” and state that “things happen”, you missed out all of the learnings that could have happened.

Similarly, after the Space Shuttle Columbia disaster, caused by a block of foam striking the left wing of the orbiter, the Columbia Accident Investigation Board was able to generate a total of 29 recommendations for improvement.

What actions would your post-mortem process have resulted in? Ensure the foam doesn’t fall off? Improve the Orbiter so it can handle debris strikes without failure? Surely not all of the 29 recommendations would have been found.

When To Stop Asking Why

The shuttle disasters were followed by reports that took months to generate after extensive investigation, due at least in part to the loss of life experienced with the disasters. So how much investigation is enough?

You stop asking why things happened when you reach a point where things are either completely outside your organization’s control or when it becomes cost prohibitive to address the risk. At some level, things become “acceptable risk” to the business. Sure you can manage a second CDN, or a second or third ISP to get to those last few nines of uptime, but then you realize if Amazon Web Service’s us-east-1 region is down, half the Internet is down anyway.

But don’t let acceptable risk become a cop-out answer. If this outage was unplanned and people are panicked, then it was not an acceptable risk. One of the root causes would then lie in the process of determining what is acceptable. If the risk was truly acceptable you would be be writing an incident report and not doing a post-mortem analysis attempting to learn from the problems.

What is an acceptable risk event like? Several years ago I had this particular 5U server. This server appeared to have been dropped off a truck or conveyor belt by the delivery company, and arrived damaged with the frame bent. While the delivery insurance covered the cost of a replacement server (as the vendor refused to provide warranty coverage on the machine due to the extent of the housing damage and we could no longer use the machine for its original purpose), the machine still booted. So the IT team hammered the frame back in workable shape and the machine was put into service for another less critical use-case. It ran fine for two or three years, until one day it suddenly died. There was no panic, this was an inevitability always planned for. We said to ourselves “Well, today is the day that happened.” There was no post-mortem for the services on the machine. We migrated what had been on that machine and moved on.

That’s how you should react to an acceptable risk problem. “Today is the day that finally happened.” That’s not to say there’s not work to be done in a timely fashion after the problem occurred, but there’s no learnings or process improvements to be had. This event was expected from the very beginning.

Mapping Causes and Effects

Complex investigations require investigating multiple avenues. Mapping the effects and causes in a tree visualization helps understanding of the problems cascade into each other, and may overlap. Visualizations can help promote collaboration – mapping the causes and effects on a whiteboard or with Post-It notes is an easy activity for the post-mortem team to engage in. It’s easy to draw another line and add in more contributing factors as they’re identified. Mapping also ensures that all of the root causes are fully explored and nothing was missed accidentally.

The action items or other tasks required following up an incident will be to eliminate as many branches as possible, preferably the leaf nodes or one level up. Eliminating the root of the tree is the same as your current process – it doesn’t ensure that these other contributing root causes won’t impact operations somewhere else in the future. Addressing as much of the problem surface as possible will maximize learnings and improvements, while minimizing the recurrence of issues.

As Margaret Hamilton, Apollo scientist and United States Presidential Medal of Freedom recipient once said, “Learn from everyone and everything, including from that which you would least expect”. source. Explore every avenue available to maximize the benefits of the post-mortem process.

December 2, 2017

Day 2 - Shifting Left Securely With inSpec

Written By: Matt Stratton (@mattstratton)
Edited By: Rich Cassara (@rjcassara)

sta·bil·i·ty
stuh-bil-i-tee

  1. the state or quality of being stable.
  2. firmness in position.
  3. continuance without change; permanence.
  4. resistance to change, especially sudden change or deterioration.
  5. steadfastness; constancy, as of character or purpose.

Stability is something that we attempt to ensure by reducing the vectors that can make changes to a system. In practice, that means “deployments are executed by trusted individuals with admin access”.

The problem with the “separation of duties” approach to solve all your stablity issues is that everyone can make mistakes. A job title doesn’t imply infallibilty. Every sysadmin who thinks that their title means they won’t make a mistake will tell me a story over a couple of pints about when they totally messed up production.

It’s also a huge burden on one group to be able to understand all the options and variance that steps in a “run book” will result in.

How do we usually do this? We might have a project that is 8 sprints long, but we don’t think about security until the 8th sprint which is the “hardening” sprint.

Naturally, we fail all of this hardening because we haven’t been thinking about security until now. Security and compliance need to be a consideration from the very beginning. We do this with tooling AND with culture. In this post, I’ll be mostly focusing on how to leverage tooling to assist in supporting the cultural changes required. Specifically, I will be focusing on using inSpec to verify your infracode (in this case I’ll be using Chef, but this will work just as well with other infracode tools).

Shift left

What is “shifting left” anyway? The idea is that we move our testing further “to the left” in our pipeline. The closer to the introduction of the defect that it is discovered, the cheaper and easier it is to fix.

Of course, this introduces some challenges, right? If my tests don’t pass, I can change the tests. We need to structure our systems to prevent this.

How does this help with security?

Compliance and security are just another aspect of quality. It would sound ludicrous to only QA test our applications right before we deploy to production. It should sound just as ridiculous to wait until a “hardening sprint” to start thinking about security and compliance.

Another problem is that often times, these tests we do at the end are heavy. That is to say, they are figuratively or literally expensive; they require large resources, or expensive per-seat licenses, so we don’t use them as often as we should.

We need something better.

Trying to prevent specific behaviors is a losing battle

  • You spend time keeping people from doing x, y, or z
  • They do a, b, or c to get the outcome they want
  • No communication happens. Insights are lost.

No matter how much you try to block the “how”, you should focus on the “what”. Consider the outcome, not the mechanism that lead to that outcome.

Perceived problem with distributed configuration management

When I suggest to sysadmins that developers should write Chef cookbooks, this is generally what they think is going to happen:

  • Developer reads on Stack Overflow that disabling selinux will make his Node app work better
  • Developer updates his cookbook to disable selinux
  • Sysadmins get fired because of 3viL haxx0rz

The better way

  • Developer reads on Stack Overflow that disabling selinux will make his Node app work better
  • Developer updates his cookbook to disable selinux
  • Developer runs local tests which include compliance checks
  • Compliance checks test for state of selinux
  • Tests fail. Developer says “Welp, I guess I can’t do that.”

What if the developers don’t run those local tests?

The pipeline catches them.

They’ll do better next time.

Even organizations that have a high-trust culture test everything. Take a page from Ronald Reagan - “Trust, but verify”. I don’t even trust myself to remember to test all the time. Remember, we enable local testing, but we don’t count on it.

If you truly care about a thing, you care enough to write a test

Often times, the excuse given is “I don’t have time to write a test for this thing”. That’s a cop-out, and I’m here to tell you that it won’t fly. This goes back to the point of lightweight tools for compliance and testing - if it’s too onerous to write these tests, nobody will do them. The good news is, it’s not that hard.

When you are writing these tests, think about this: we are testing for outcomes. Outcomes are what matter. Our pipeline is creating an artifact (in the case of infracode, this artifact is a converged node). What matters is the state of that outcome. How you got it there is not the question. We should be testing compliance and security against artifacts, and the outcome we are testing is “is this thing the way it should be, or is it a scary nightmare that should never see production”?

Democratize your testing

Remember when I talked about the hubris of sysadmins? Infosec folks do it too. Tools are kind of the least important thing to think about, but make sure it’s not a tool that can only run tests from the security folks. If you care about compliance, move that stuff to the left. If your tool can’t do that, it’s time to find another tool.

That doesn’t mean you need to throw out what you have, but consider adding something. The more that you can emulate whatever you care about testing in production into your pipeline, the happier you will be. Monitoring is just testing with a time dimension; this applies to compliance as well.

What you do not want to do is have a test in the pipeline that cannot be run by the local developer. Basically, if you do this, you’re a big meanie[1].

Enter inSpec

InSpec is compliance as code. We write controls that test for the state of the system, and report back on this state. It’s also pretty easy to read, as it’s written in a spec-style langauge. Consider the difference between these two ways of checking the SSH protocol version on a system:

Shell

> grep "^Protocol" /etc/ssh/sshd_config | sed 's/Protocol //'
 2
 ```
 ### inSpec
```ruby
control 'ssh-1234' do
  impact 1.0
  title 'Server: Set protocol version to SSHv2'
  desc "
    Set the SSH protocol version to 2. Don't use legacy
    insecure SSHv1 connections anymore...
  "

  describe sshd_config do
   its('Protocol') { should eq 2 }
  end
end

As you can see, with inSpec, not only is if fairly human-readable, it provides context. We understand the impact of the control, and we can even add a nice description to explain what this is all about. The user experience[2] is better.

Examples

(All code for this post can be found at github.com/mattstratton/sysadvent-2017)

Cookbook

We start by taking a look at a basic cookbook that creates a user and gives it ownership of the /var/log directory (which we probably don’t want to happen):

user 'sa2017-app' do
  comment 'SysAdvent User'
  system true
  shell '/bin/false'
end

directory '/var/log' do
  owner 'sa2017-app'
end

Compliance profile

Our compliance profile for confirming that /var/log is owned by root looks like this:

title 'Directory Tests'

control 'log-1.0' do                        
  impact 0.7                                
  title 'Ownership of /var/log'             
  desc 'The /var/log directory should be owned by root'
  describe file('/var/log') do
    it { should be_directory }
    it { should be_owned_by 'root' }
  end
end

Tying it together

In this case, I’ve created a Jenkins pipeline that responds to changes on the cookbook’s GitHub repo. The Jenkinsfile defines the following stages:

  1. Lint - Runs foodcritic and cookstyle against the cookbook
  2. Smoke - Runs kitchen test using the tests in the cookbook itself
  3. Compliance - Runs kitchen test, but includes our compliance profile, loaded for a git URL.

In order to accomplish the Compliance stage, we generate a new kitchen.yml file, which includes the path to the test we want to include. There are other ways to accomplish this, and it will depend upon how you build your pipelines. But hopefully this illustrates one way it can be done.

To prove the point, here’s the output in Jenkins when the Compliance stage is run:

Profile: My Compliance (sa2017-compliance)
Version: 0.1.0
Target:  docker://4967508ea0b8f431b161edf561164ab8a49eba780b58ed85673f64c60b3bb8bd

 [38;5;9m  ×  log-1.0: Ownership of /var/log (1 failed) [0m
 [38;5;41m     ✔  File /var/log should be directory [0m
 [38;5;9m     ×  File /var/log should be owned by "root"
     expected `File /var/log.owned_by?("root")` to return true, got false [0m

Profile Summary: 0 successful controls,  [38;5;9m1 control failure [0m, 0 controls skipped

[1] - Sorry for the strong language.
[2] - And I bet you thought “user experience” was just for front-end developers.