
By: Patrick Cable (@patcable) Edited By: Gareth Rushgrove (@garetr)
Imagine that you’re working Pettr, the next generation Twitter for Pets. You’ve launched, pets are tweeting at least two times more often, so your growth is through the roof. What an exciting time for you! Now that the platform is off the ground, you’ve noticed a couple areas for improvement:
- The security of the control plane leaves a lot to be desired. Users have tons of SSH keys, some protected, some not.
- TLS between a lot of our internal services wasn’t ever set up.
You’ve decided to attack both of these issues over the next few months. Where could you begin? Well, one place you could start is by creating an internal Public Key Infrastructure, or PKI. PKIs are a way to make trust “happen” between two servers or two people. Wouldn’t it be nice if you could ensure your SSH or VPN access keys were on a physical token? Also, it’d be great if you could generate short term certificates for service communication. Well, great news for you: PKIs will get you where you gotta go.
Understanding Keys and Certificates and Authorities (oh my!)
There are many ways to secure communications between two different machines (or people). It’s the job of a cryptographer to create protocols and algorithms to do things like establish trust and identity. TLS, for example, is one of the protocols that secures most of the communications on the Internet. You might have heard it referred to as SSL as well - and that’s okay too, it refers to an earlier version of protocol. It’s what makes https work.
For you to access a site over HTTPS, the operator had to generate a private key and certificate signing request (CSR) for that private key. This CSR contains a few bits of information:
- The public component of the private key
- The hostname of the server it will protect
- Data about the operating organization
The certificate request is sent to a trusted third party called a Certificate Authority. That CA then issues you a certificate.
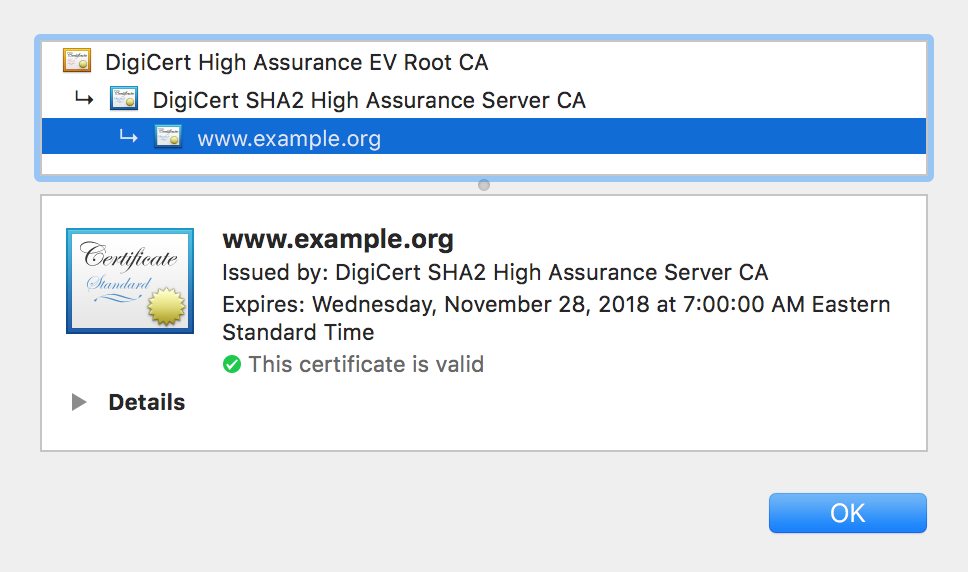
Let’s look at an example certificate chain. If you open https://example.org, the server will send its certificate (example.org) and intermediate (DigiCert SHA2 High Assurance Server CA). Our browser shipped with the public key of the Root Certificate Authority (DigiCert High Assurance EV Root CA), so it is able to validate the whole chain. Now both ends of the connection will negotiate a session key and begin communicating securely on the Internet.
Root CAs? In MY browser?
You know that browsers ship with a set of Certificate Authorities. But how did they get there to begin with?
A Root CA that is recognized by web browsers has played by the rules specified by an organization called the CA/Browser Forum. Certificate Authorities are incentivized to play by the rules because for many, issuing certificates is what these organizations do. They would like to continue doing that. The penalty for not playing by the rules is that browsers will stop including their Root CA certificate.
A Root CA is a private key and a self-signed certificate that has some options set and generally has a long lifetime. It is protected carefully (many of the controls are physical), and generally key operations with it are performed on separate machines disconnected from the Internet. This means with some careful planning you could have your very own root CA that is trusted within your infrastructure to provide secure communications and identity.
You’ll still need to provide external endpoints with externally issued CA certificates. Otherwise, your users will get browser errors when they visit your site. But your internal communication and identity verification tools can use your CA to as a root of trust to identify users and servers.
Danger: High Voltage
PKIs sound great, and they will help you out significantly with your security project. However, security technologies often involve tradeoffs, and this is no different.
One of the biggest risks is the loss of the private key of the Root CA for your PKI. If the private key of the CA is stolen, someone could issue new certificates that your infrastructure would trust because of their origin. This sounds like something that should never happen - and you would be correct. This has happened before to much larger certificate authorities with much larger implications than your CA.
This article is going to outline a way that creating a PKI can work for smaller organizations. As you grow some of these processes may need refinement. For one, you’ll be using certificate revocation lists (CRLs). The newer Online Certificate Status Protocol (OCSP) can verify all issued and revoked certificates. This is better for validation, but requires additional infrastructure. Second, provisioning users is a manual process. Not all users need VPN or SSH access. If you provide a lot of folks with this access, you’ll need automation and an online system that can issue the certificates.
Physical Security Matters
To begin, you’ll need to have a few bits of infrastructure in place to securely generate keys - especially the ones needed for our Root CA.
Key Operations Computer
First, you’ll want a separate computer that does not connect to the internet and boots off of fresh read-only material each time. While it is possible for you to create certificates on any computer, you shouldn’t. Keeping this task limited to a separate machine reduces the risk of a malware infection leading to key exfiltration. Key material should live on an external encrypted drive. You’re booting off of read-only media to begin with, so you can’t keep it on the computer.
This article will focus specifically on using Linux tools to generate and place certificates. Windows does have some CA functionality built into it - but the security considerations differ a little bit there.
Creating a LiveCD
Many Linux distributions allow you to customize a LiveCD. This does mean you have to trust the distribution vendor’s base install, but we’ve got to start somewhere. You can limit the “blast radius” of this by using the smallest default install you can, and customizing the rest.
You’ll need the following tools on your LiveCD:
- Utilities for talking to YubiKeys (pcscd, yubico-piv-tool)
- CFSSL, the CloudFlare PKI Toolkit which is a little easier to use than OpenSSL
jq, a command line JSON parser
Storage and Backup
You’ll want an encrypted flash drive to store key material on, and a procedure for backing that key material up. A loss of the key material means you’ll have to go through all this again.
For now, make a plan on how you want to protect this. You’ll want a safe, or a safe deposit box, or a lawyer to store all key material with. Maybe you store the backup in a safe deposit box or with your lawyer. If you buy a safe, make sure the safe is not something that you could easily move — otherwise someone could take the whole thing.
An online place to store key material
If we’re going to actually use this PKI, you’ll need something to issue certificates. Vault is a good candidate here, and will also maintain a list of revoked/expired certificates that you’ll use as a Certificate Revocation List. This article will make heavy use of Vault, so you’ll need it (or something like it) set up.
Generate your CA
Now that you have the physical security prerequisites out of the way, you can begin generating the CA certificates. We’re going to create a Root CA with a 10 year life, and intermediate CAs that are signed by that root with a 5 year life.
Intermediate CAs help us protect the root. In the event of a compromise of an intermediate, it is easier to generate a new intermediate CA than a new root.
Make a directory called config and ca to begin.
Create config/ca-csr.json:
  {
    "CN": "Pettr Root CA",
    "key": {
      "algo": "ecdsa",
      "size": "384"
    },
    "names": [
      {
        "C": "US",
        "ST": "Massachusetts",
        "L": "Boston",
        "O": "Pettr, LLC."
      }
    ]
  }
The CN is how your CA will appear in a certificate chain. The settings for key (algo and size) determine the encryption key algorithm and length. If you control the entire infrastructure, you can set this to something modern (like ecdsa and 384). If your root CA may be installed on devices that aren’t running something modern (printers, routers) then you may want to use to rsa and 2048. The most important part, regardless of key length, is that the private key for your CA stays off-line and protected.
Build the CA using cfssl gencert -initca ca-csr.json | cfssljson -bare ca/ca. All of cfssl output is in JSON, so cfssljson will write it out to ca.pem and ca-key.pem. You’ll need to add some attributes to the certificate that can’t be added to the initial request. These attributes include the usages for this certificate, and also the crl_url.
Create config/ca-sign.json:
  {
    "signing": {
      "default": {
        "expiry": "87600h",
        "usages": ["cert sign", "crl sign"],
        "ca_constraint": {
          "is_ca": true,
          "max_path_len": 1,
          "max_path_len_zero": false
        },
        crl_url": "https://pettr.example.com/ca.crl"
      }
    }
  }
Now you’ll need to run:
cfssl sign -ca ca/ca.pem -ca-key ca/ca-key.pem -config config/ca-sign.json ca/ca.csr | cfssljson -bare ca/cato generate the new certificatecfssl gencrl ca/revoked-certs ca/ca.pem ca/ca-key.pem 31540000 | base64 -d > ca/ca.csrto generate a CRL good for a year
Now you have a CA that can generate intermediate CAs! Make sure you copy the ca/ca.pem file - that’s the CA’s public key. You’ll need to put ca.crl at the URL you specified for crl_url.
You’ll want to make two empty files as well: ca/issued-certs and ca/revoked-certs. You’ll use these to track the certificates you issue off the CA.
Generate Intermediate CAs
We’re going to make an intermediate CA for our Development, Testing, and Production environments. You’ll also make one for certificates that identify a particular user (you can call it users). Separating machine trust (services talking to each other) and user trust (identifying people) helps us not redefine users across all environments.
Create a CSR request, and a signing request. You’ll repeat this for each environment you want to build an intermediate for.
Create config/int-csr-dev.json:
  {
    "CN": "Pettr DEV CA-1",
    "key": {
      "algo": "ecdsa",
      "size": 384
    },
    "names": [
      {
        "C": "US",
        "L": "Boston",
        "O": "Pettr, LLC",
        "ST": "Massachusetts"
      }
    ],
    "ca": {
      "expiry": "35040h"
    }
  }
Create config/int-sign-dev.json:
  {
   "signing": {
      "default": {
        "usages": [ "cert sign", "crl sign" ],
        "expiry": "35040h",
        "ca_constraint": {
          "is_ca": true,
          "max_path_len": 0,
          "max_path_len_zero": true
        },
        "crl_url": "https://vault.pettr.example.com:8200/v1/pki/crl"
      }
    }
  }
You’ll notice that we set the URL to Vault’s PKI CRL endpoint. For your users CA, you would point this to somewhere perhaps alongside where you store your CA CRL.
Generate your intermediates. This guide will show this process for the dev environment, but you’ll repeat this for each intermediate, replacing filenames and comments as needed:
- Make a folder for the intermediate -
mkdir dev - Make the certificate
cfssl gencert -initca config/int-csr-dev.json | cfssljson -bare dev/dev - Sign and replace the certificate with extra options:
cfssl sign -ca ca/ca.pem -ca-key ca/ca-key.pem -config config/int-sign-dev.json dev/dev.csr | cfssljson -bare dev/dev - Record the issuance in your
issued-certsfile:echo "$(cfssl certinfo -cert dev/dev.pem | jq .serial_number | tr -d '"') # DEV CA" >> ca/issued-certs.
Now we’re done making intermediates. You’ll need to copy these keys and certificates to a machine that can access Vault. Hold off on copying the Users CA - keep that on the laptop. You’ll use that for provisioning YubiKeys (discussed later in this document).
Protecting your Root
You’re done with your root certificate for a while. Store it safely, as you’ll only use it to configure new intermediate CAs. GPG Encrypt the ca directory, or store it on a separate encrypted flash drive.
Using your new PKI
So you’ve generated a PKI. What now? Well, before you do anything: you’re going to have to tell your infrastructure about your shiny new CA. I’ll cover the ways i’m familiar with, you may have to do some digging for other systems.
On Debian-flavored distributions, use your configuration management tool of choice to place your CA public key in /usr/share/ca-certificates/pettr/ca.crt. That same configuration management tool can place a pettr/ca.crt line in /etc/ca-certificates.conf. Run update-ca-certificates. This will update /etc/ssl/certs with a link to your certificate. It will also update /etc/ssl/certs/ca-certificates.crt with your certificate. This file is a default “trust store” for many applications on your system. Many distribution packages will use this file/directory to determine PKI/CA trust.
Some applications use their own trust store. For example, the JVM has it’s own trust store in $JAVA_HOME/jre/lib/security/cacerts. You can add the certificate to it by running:
keytool -import -noprompt -trustcacerts -file /usr/share/ca-certificates/pettr/ca.crt -alias PETTR-CA -keystore $JAVA_HOME/jre/lib/security/cacerts -storepass changeitAfter you run this, you’ll need to restart your JVM-based application. As an aside: the CA certificate store is not storing any private keys, so it does not have a secure password. You do need to be root to change the file, though.
Make sure to distribute your CA certificate to employee machines. This is important if you plan on using your PKI to protect internal applications. Doing this will ensure that their browser does not display TLS errors when browsing internal sites. We’ve all clicked through those warnings while testing systems. Doing this normalizes bad behavior though - and what if we’re not paying attention and click through something more devious? Forcing ourselves to react to the browser TLS warning is a security win.
Your internal applications may default to using the system trust root. They also may not. You’ll need to perform some investigation to see if they use the system trust roots.
Put Intermediate CAs into Vault
A convenient way to generate short-term certificates for services involves using Vault. Vault can serve as its own CA and keep its private keys to itself. Managing this outside of Vault gives the flexibility to make new intermediate CAs that don’t need Vault.
To begin, mount the pki endpoint by running vault mount pki. Then, you’ll want to set the max-lease-ttl for your infrastructure. This sets the upper bounds on how long a certificate can last within your infrastructure. To do this, run vault mount-tune -max-lease-ttl=730h pki. This tells vault that any certificate the PKI backend generates can be valid for 1 month, at most.
To import our intermediate CA certificate and key, combine:
* The private key for the DEV intermediate CA * The public key for the DEV intermediate CA * The public key for the Root CA
You can do this using cat - cat dev-key.pem dev.pem ca.pem > bundle. Once you have that file, collapse it into one line by running sed 's/$/\\n/' FILENAME | tr -d '\n'. Insert that line into a JSON file named bundle.json:
{
    "pem_bundle": "sed output here"
}
and insert it into Vault with vault write pki/config/ca @bundle.json. Our CA is now ready for use with Vault!
To test this, you’ll need to make a role for certificate creation. This allows us to set parameters for certificate generation. You’ll want to refer to the Vault PKI documentation and API documentation for specific parameters, but here is a sample:
vault write pki/roles/tls \
    allowed_domains="dev.pettr.example.com" \
    allow_subdomains="true" max_ttl="168h" \
    client_flag="false"
This creates a role named tls which can issue certificates for HOSTNAME.dev.pettr.example.com. These certificates can be valid for up to 1 week.
Finally, let’s test. Run vault write pki/issue/tls common_name=test.dev.pettr.example.com ttl=5m. This should issue us a certificate, valid for 5 minutes, for the hostname test.dev.pettr.example.com. Take the output for certificate and put it in a file named test.pem. Then, run openssl x509 -noout -text -in test.pem. You should see information about the certificate, but of interest:
        Issuer: C=US, ST=Massachusetts, L=Boston, O=Pettr LLC.,  CN=Pettr DEV CA-1
        Validity
            Not Before: Nov 26 16:24:54 2017 GMT
            Not After : Nov 26 16:30:24 2017 GMT
Now Vault is issuing certificates signed by our intermediate CA. This means you can automate this behavior. If you use Chef and are hosted in EC2, you could build a Chef resource to authenticate to Vault using the AWS Instance Identity Document, then request a certificate.
Provision User Identity with YubiKeys
Many of you are familiar with YubiKeys. YubiKeys are hardware security tokens that can output a one-time unique code. Later versions of the device (the Neo and 4) support extra authentication methods. One of these methods, U2F can serve as a second factor for websites. These devices also support key generation and storage - like smart cards. The YubiKey can store GPG certificates, but it can also store certificates for use with NIST’s Personal Identity Verification (PIV) standard. This means you can use the YubiKey to store certificates signed by your Users intermediate CA. Then, you can use your key to authenticate your users across your infrastructure. We’re going to focus on that.
Before you begin: In October 2017, security researchers discovered a bug in code shipped by Infineon that generates RSA keys. The Infineon RSALib code is in a variety of security hardware, including the YubiKey. This bug allows an adversary that has your public key to generate the private key in a matter of weeks or days (vs. years). Since you’ll be using the key generation mechanism on the YubiKey, it is critical that you are using a newer YubiKey. Yubico is replacing affected devices for no cost. For more information check out their site.
The YubiKey Neo & 4 have four different “slots” that certificates can be stored in. You can find more information about all of this on Yubico’s website, but to summarize:
- Slot 9A is used to authenticate a person (Logging into systems)
- Slot 9C is used for digital signatures (Signing a document, email)
- Slot 9D is used for key management (Encrypting files)
- Slot 9E is for physical authentication (Unlocking a door)
You will provision certificates for our YubiKeys in slot 9A and 9D. The key/certificate pair in 9A is used to authenticate users within our infrastructure. Of note, the certificate in 9D is not used. However, having a certificate in that slot is helpful if you wish to use your YubiKey as an authentication method on a Macintosh running MacOS 10.12 or later. Setting this up is outside the scope of this post, but your Mac should ask if you’re interested in doing this when you insert a properly configured YubiKey. It can be set up manually (or turned off) using the sc_auth command as well.
Generating the Identity Certificate
These actions can be performed on the computer you used to generate our initial keys. You only need the Users intermediate CA key pair. Boot your provisioning machine and unlock your PKI media. Change into the directory where you stored the intermediate CA directories (config, dev-1, prod-1, users-1). Make a directory called users-1-reqs. Next, you’ll need to create a config file to use with CFSSL for user certificates. Create config/user-config.json:
{
    "signing": {
        "default": {
            "expiry": "17520h"
        },
        "profiles": {
            "9a": {
                "expiry": "17520h",
                "usages": [
                    "signing",
                    "client auth"
                ]
            },
            "9d": {
                "expiry": "17520h",
                "usages": [
                    "key encipherment",
                    "key agreement"
                ]
            }
        }
    }
}
This config file specifies a 2 year (17520 hours) validity for these certificates. In 2 years you’ll need to provide a new certificate for your user.
Now you’ll need to use the yubico-piv-tool to generate a key on the device, export a CSR, then sign that CSR with our Users intermediate CA. You can script this behavior. Begin by creating user-yk-init.sh:
#!/bin/bash

if [[ $1 == "" ]]; then
    echo "Usage: $0 [username]"
    echo "  Initializes the PIV app on a Yubikey"
    exit 1
fi

# The Management Key is used to configure certain PIV settings on the key.
MGMT_KEY=$(cat /dev/urandom | tr -dc '0-9' |fold -w48 | head -n1)
echo $MGMT_KEY > users-1/${1}.yubimgt

# The CHUID/CCC is a identifier for this specific YubiKey. Systems need this
# to know how to refer to the key
echo "Set new CHUID/CCC"
yubico-piv-tool -a set-chuid -a set-ccc

# The YubiKey has a Physical Unlock Key to allow reprovisioning the key if the
# user forgets the PIN. We disable this functionality, because it could allow
# an adversary that gets the key that knows the unlock code unlimited retries.
echo "Brick PUK"
yubico-piv-tool -a unblock-pin -P 000000 -N 000000
yubico-piv-tool -a unblock-pin -P 000000 -N 000000
yubico-piv-tool -a unblock-pin -P 000000 -N 000000

# Generate a key on the card, and a CSR for the key
yubico-piv-tool -a generate -s 9a -A RSA2048 -o yktmp
yubico-piv-tool -s 9a -S "/C=US/ST=Massachusetts/L=Boston/O=Pettr, LLC./CN=${1}/" -a verify -a request -i yktmp -o users-1-reqs/${1}.csr -P 123456

# Take the CSR and sign it using the Users CA. Capture serial and place in
# a issued-certs file for a record.
cfssl sign -config=config/user-config.json -ca=users-1/users-1.pem -ca-key=users-1/users-1-key.pem -profile=9a users-1-reqs/${1}.csr | cfssljson -bare users-1/${1}
SERIAL=$(cfssl certinfo -cert users-1/${1}.pem | jq .serial_number | tr -d '"')
echo "$SERIAL # ${1}, 9a, no-local-key" >> users-1/issued-certs

# Import the certificate into slot 9a
yubico-piv-tool -a import-certificate -s 9a -i users-1/${1}.pem

# The User needs to set an 8-digit PIN for the certificate in 9A.
echo "Set PIN on device. End user should be here for this part."
yubico-piv-tool -a change-pin -P 123456

# Lock the key
echo "Set new to ${MGMT_KEY} below (written to users-1/${1}.yubimgt)"
yubico-piv-tool -a set-mgm-key -n ${MGMT_KEY}

rm yktmp

echo "Device initialized. Identity loaded."
You can now run ./user-yk-init.sh <username> to initialize a user’s YubiKey. Make sure the user is there - they’ll need to create an 8 digit PIN to unlock the device. RSA certificates are used at the user/server certificate level because of RSA’s wide support. As more applications can validate EC certificates it may be worth switching. Of note, if the user enters this wrong 3 times the device will be reset. If you’re managing all of this, it’s handy to have yubico-piv-tool on your desktop so that you can check the amount of PIN retries a YubiKey has with yubico-piv-tool -a status.
Encryption Certificate
If you want to provision an encryption certificate to the YubiKey, you’ll want to generate and keep that certificate on the laptop, generated on the YubiKey That’s because you won’t want to lose the encryption key, in case other data is encrypted with it and you need to decrypt it sometime. This is called Key Escrow.
Create user-yk-9d-init.sh:
#!/bin/bash

if [[ $1 == "" ]]; then
    echo "Usage: $0 [username]"
    exit 1
fi

if [[ ! -f users-1/${1}.yubimgt ]]; then
    echo "The user's management key doesnt exist in users-1/${1}.yubimgt."
    echo "Has the key been provisioned with ./user-yk-init.sh?"
    exit 1
fi

echo -n "About to make 9d cert for user $1 [enter to continue]"
read JUNK

# Create a CFSSL JSON CSR for the keypair for slot 9D
cat > users-1-reqs/${1}-9d.json << __EOF
{
    "CN": "$1",
    "hosts": [
    ],
    "key": {
        "algo": "rsa",
        "size": 2048
    },
    "names": [
        {
            "C": "US",
            "ST": "Massachusetts",
            "L": "Boston",
            "O": "Pettr, LLC."
        }
    ]
}
__EOF

# Generate the keypair and write it out
cfssl gencert -config=config/user-config.json -ca=users-1/users-1.pem -ca-key=users-1/users-1-key.pem -profile=9d users-1-reqs/${1}-9d.json | cfssljson -bare users-1/${1}-9d
SERIAL=$(cfssl certinfo -cert users-1/${1}-9d.pem | jq .serial_number | tr -d '"')
echo "$SERIAL # ${1}, 9d" >> users-1/issued-certs

# Make sure that process gave us what we need
if [[ ! -f users-1/${1}-9d.pem ]]; then
    echo "The user's public certificate doesnt exist in users-1/${1}-9d.pem"
    echo "The cfssl gencert command might have failed."
    exit 1
fi
if [[ ! -f users-1/${1}-9d-key.pem ]]; then
    echo "The user's private key doesnt exist in users-1/${1}-9d-key.pem"
    echo "The cfssl gencert command might have failed."
    exit 1
fi

MGMT_KEY=$(cat users-1/${1}.yubimgt)

# Write certificates
echo "Writing privkey from users-1/${1}-9d-key.pem to slot 9d"
yubico-piv-tool -a import-key -k${MGMT_KEY} -s 9d -i users-1/${1}-9d-key.pem

echo "Writing pubcert from users-1/${1}-9d.pem to slot 9d"
yubico-piv-tool -a import-certificate -k${MGMT_KEY} -s 9d -i users-1/${1}-9d.pem
Now your YubiKey has an encryption certificate on the device.
Configuring client devices to use YubiKey certificates
Once you’ve got a YubiKey provisioned with certificates, you’ll need to configure client applications on your client endpoints to use these certificates. Client applications use a standard called PKCS11 to “talk” to YubiKeys and Smart Card-like devices.
First, you’ll need a PKCS11 library. The OpenSC library will serve this purpose and is available for multiple platforms. This library is available in Homebrew, as well under the package name opensc.
SSH
To get your YubiKey working with SSH, you’ll need to install the OpenSC library in a place that your SSH agent allows PKCS11 libraries to reside. On systems running Mac OS, this is /usr/local/lib. Note that the full library must be there; symlinks will not work. On other platforms running OpenSSH 7.4 or later, you’ll need to make sure your SSH Agent is configured accordingly (check the agent’s -P flag).
You can get the public keys from your YubiKey using ssh-keygen -D /path/to/opensc-pkcs11.so. The first line represents the output of slot 9A’s certificate. If you provisioned a certificate in slot 9D, that will show second. To use these keys, you can run ssh-add -s /path/to/opensc-pkcs11.so. You will be asked for your “PKCS11 Passphrase” - this is the 8 digit PIN you set during the provisioning process. If the PIN is correct, your SSH agent will import those keys for use with SSH sessions.
You’ll need to re-add these keys when the YubiKey enters a locked state (usually when it’s removed or powered off) - so it might be helpful to make an alias for your ssh-add command.
OpenVPN
If you use a VPN client, you can also use the OpenSC library with it as well. You’ll need to configure the server to recognize certificates issued by Users intermediate CA, and configure the client to use the OpenSC library. I’ve tested this using Viscosity on Macintosh and Windows. Point Viscosity to the appropriate PKCS11 library in the VPN profile settings, click “detect” and the yubikey certificates show up and will be used as part of the authentication process.
Wrapping up
When I was working through this process for myself I had a hard time finding information on building and maintaining a PKI. Like many security technologies, there are a lot of ways to accomplish this task and the “security” of any of them are built on tradeoffs based on your organization’s threat model. My hope is that this article gave you an idea of how you could use a PKI and what a sample one for a small organization might look like. Ultimately, it’s on you to decide what bits make sense for your infrastructure.
If you want to read about more complicated key signing and provisioning processes for a unique threat model, I recently read about the DNSSEC Root Signing Ceremony and found that interesting. Enjoy!


No comments :
Post a Comment