
By: Sebastiaan van Steenis (@svsteenis)
Edited By: Mike Ciavarella (@mxcia)
Containers are a great solution for consistent software deployments. When you start using containers in your environment, you and your team will quickly realise that you need a system which allows you to automate container operations. You need a system to keep your containers running when stuff breaks (which always happens, expect failure!), be able to scale up and down, and which is also extensible, so you can interact with it or built upon it to get the functionality you need. The most popular system for deploying, scaling and managing containerized applications is Kubernetes.
Kubernetes is a great piece of software. It includes all the functionality you'll initially need to deploy, scale and operate your containers, as well as more advanced options for customising exactly how your containers are managed. A number of companies provide managed Kubernetes-as-a-service, but there are still plenty of use-cases that need to run on bare metal to meet regulatory requirements, use existing investments in hardware, or for other reasons. In this post we will use Rancher Kubernetes Engine (rke) to deploy a Kubernetes cluster on any machine you prefer, install the NGINX ingress controller, and setup dynamic load balancing across containers, using that NGINX ingress controller.
Setting up Kubernetes
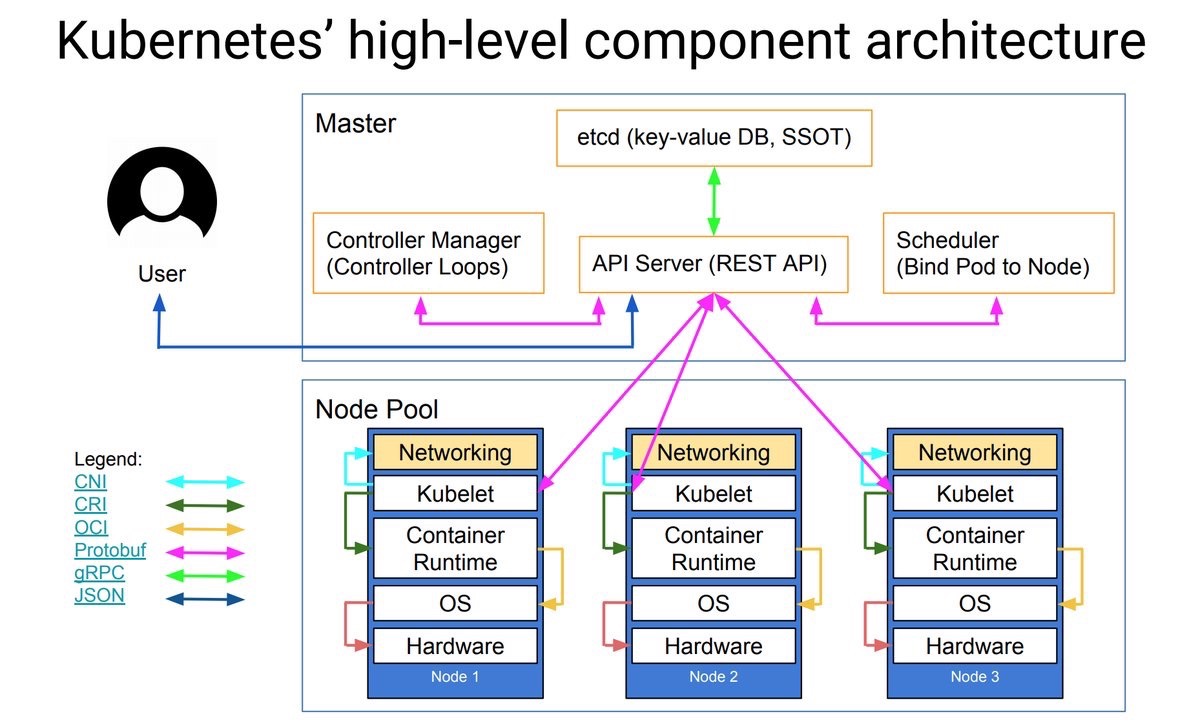
Let's briefly go through the Kubernetes components before we deploy them. You can use the picture below for visualisation. Thanks to Lucas Käldström for creating this (@kubernetesonarm), used in his presentation on KubeCon.
Using rke, we can define 3 roles for our hosts:
control (controlplane)
The controlplane consists of all the master components. In rke the etcd role is specified separatately but can be placed on the same host as the controlplane. The API server is the frontend to your cluster, handling the API requests you run (for example, through the Kubernetes CLI client
kubectlwhich we talk about later). The controlplane also runs the controller manager, which is responsible for running controllers that execute routine tasks.etcd
The key-value store and the only component which has state, hence the term SSOT in the picture (Single Source of Truth). etcd needs quorum to operate, you can calculate quorum by using (n/2)+1 where n is the amount of members (which are usually hosts). This means for a production deployment, you would deploy at least 3 hosts with the etcd role. etcd will continue to function as long as it has quorum, so with 3 hosts with the etcd role you can have one host fail before you get in real trouble. Also make sure you have a backup plan for etcd.
worker
A host with the worker role will be used to run the actual workloads. It will run the kubelet, which is basically the Kubernetes agent on a host. As one of its activities, kubelet will process the requested workload(s) for that host. Each worker will also run kube-proxy which is responsible for the networking rules and port forwarding. The container runtime we are using is Docker, and for this setup we'll be using the Flannel CNI plugin to handle the networking between all the deployed services on your cluster. Flannel will create an overlay network between the hosts, so that deployed containers can talk to each other.
For more information on Kubernetes components, see the Kubernetes documentation.
For this setup we'll be using 3 hosts, 1 host will be used as controlplane (master) and etcd (persistent data store) node, 1 will be used as worker for running containers and 1 host will be used as worker and loadbalancer entrypoint for your cluster.
Hosts
You need at least OpenSSH server 7 installed on your host, so rke can use it to tunnel to the Docker socket. Please note that there is a known issue when connecting as the root user on RHEL/CentOS based systems, you should use an other user on these systems.
SSH key authentication will be used to setup an SSH tunnel to the Docker socket, to launch the needed containers for Kubernetes to function. Tutorials how to set this up, can be found for Linux and Windows
Make sure you have either swap disabled on the host, or configure the following in cluster.yml for kubelet (we will generate cluster.yml in the next step)
kubelet:
  image: rancher/k8s:v1.8.3-rancher2
  extra_args: {"fail-swap-on":"false"}
Docker
The hosts need to run Linux and use Docker version 1.12.6, 1.13.1 or 17.03.2. These are the Docker versions that are validated for Kubernetes 1.8, which we will be deploying. For easy installation of Docker, Rancher provides shell scripts to install a specific Docker version. For this setup we will be using 17.03.2 which you can install using (for other versions, see https://github.com/rancher/install-docker):
curl https://releases.rancher.com/install-docker/17.03.2.sh | sudo sh
If you are not using the root user to connect to the host, make sure the user you are using can access the Docker socket (/var/run/docker.sock) on the host. This can be achieved by adding the user to the docker group (e.g. by using sudo usermod -aG docker your_username). For complete instructions, see the Docker documentation.
Networking
The network ports that will be used by rke are port 22 (to all hosts, for SSH) and port 6443 (to the master node, Kubernetes API).
rke
Note: in the examples we are using rke_darwin-amd64, which is the binary for MacOS. If you are using Linux, replace that with rke_linux-amd64.
Before we can use rke, we need to get the latest rke release, at the moment this is v0.0.8-dev. Download rke v0.0.8-dev from the GitHub release page, and place in a rke directory. We will be using this directory to create the cluster configuration file cluster.yml. Open a terminal, make sure you are in your rke directory (or that rke_darwin-amd64 is in your $PATH), and run ./rke_darwin-amd64 config. Pay close attention to specifying the correct SSH Private Key Path and the SSH User of host:
$ ./rke_darwin-amd64 config
Cluster Level SSH Private Key Path [~/.ssh/id_rsa]:
Number of Hosts [3]: 3
SSH Address of host (1) [none]: IP_MASTER_HOST
SSH Private Key Path of host (IP_MASTER_HOST) [none]:
SSH Private Key of host (IP_MASTER_HOST) [none]:
SSH User of host (IP_MASTER_HOST) [ubuntu]: root
Is host (IP_MASTER_HOST) a control host (y/n)? [y]: y
Is host (IP_MASTER_HOST) a worker host (y/n)? [n]: n
Is host (IP_MASTER_HOST) an Etcd host (y/n)? [n]: y
Override Hostname of host (IP_MASTER_HOST) [none]:
Internal IP of host (IP_MASTER_HOST) [none]:
Docker socket path on host (IP_MASTER_HOST) [/var/run/docker.sock]:
SSH Address of host (2) [none]: IP_WORKER_HOST
SSH Private Key Path of host (IP_WORKER_HOST) [none]:
SSH Private Key of host (IP_WORKER_HOST) [none]:
SSH User of host (IP_WORKER_HOST) [ubuntu]: root
Is host (IP_WORKER_HOST) a control host (y/n)? [y]: n
Is host (IP_WORKER_HOST) a worker host (y/n)? [n]: y
Is host (IP_WORKER_HOST) an Etcd host (y/n)? [n]: n
Override Hostname of host (IP_WORKER_HOST) [none]:
Internal IP of host (IP_WORKER_HOST) [none]:
Docker socket path on host (IP_WORKER_HOST) [/var/run/docker.sock]:
SSH Address of host (3) [none]: IP_WORKER_LB_HOST
SSH Private Key Path of host (IP_WORKER_LB_HOST) [none]:
SSH Private Key of host (IP_WORKER_LB_HOST) [none]:
SSH User of host (IP_WORKER_LB_HOST) [ubuntu]: root
Is host (IP_WORKER_LB_HOST) a control host (y/n)? [y]: n
Is host (IP_WORKER_LB_HOST) a worker host (y/n)? [n]: y
Is host (IP_WORKER_LB_HOST) an Etcd host (y/n)? [n]: n
Override Hostname of host (IP_WORKER_LB_HOST) [none]:
Internal IP of host (IP_WORKER_LB_HOST) [none]:
Docker socket path on host (IP_WORKER_LB_HOST) [/var/run/docker.sock]:
Network Plugin Type [flannel]:
Authentication Strategy [x509]:
Etcd Docker Image [quay.io/coreos/etcd:latest]:
Kubernetes Docker image [rancher/k8s:v1.8.3-rancher2]:
Cluster domain [cluster.local]:
Service Cluster IP Range [10.233.0.0/18]:
Cluster Network CIDR [10.233.64.0/18]:
Cluster DNS Service IP [10.233.0.3]:
Infra Container image [gcr.io/google_containers/pause-amd64:3.0]:
This will generate a cluster.yml file, which can be used by rke to setup the cluster. By default, Flannel is used as CNI network plugin. To secure the Kubernetes components, rke generates certificates and configures the Kubernetes components to use the created certificates.
You can always check or edit the file (cluster.yml) if you made a typo or used the wrong IP address somewhere.
We are now ready to let rke create the cluster for us (specifying --config is only necessary when cluster.yml is not present in the same directory where you are running the rke command)
$ ./rke_darwin-amd64 up --config cluster.yml
INFO[0000] Building Kubernetes cluster
INFO[0000] [ssh] Setup tunnel for host [IP_MASTER_HOST]
INFO[0000] [ssh] Setup tunnel for host [IP_MASTER_HOST]
INFO[0000] [ssh] Setup tunnel for host [IP_WORKER_HOST]
INFO[0001] [ssh] Setup tunnel for host [IP_WORKER_LB_HOST]
INFO[0001] [certificates] Generating kubernetes certificates
INFO[0001] [certificates] Generating CA kubernetes certificates
INFO[0002] [certificates] Generating Kubernetes API server certificates
INFO[0002] [certificates] Generating Kube Controller certificates
INFO[0002] [certificates] Generating Kube Scheduler certificates
INFO[0002] [certificates] Generating Kube Proxy certificates
INFO[0003] [certificates] Generating Node certificate
INFO[0003] [certificates] Generating admin certificates and kubeconfig
INFO[0003] [reconcile] Reconciling cluster state
INFO[0003] [reconcile] This is newly generated cluster
...
INFO[0263] Finished building Kubernetes cluster successfully
All done! Your Kubernetes cluster is up and running in under 5 minutes, and most of that time was spent on pulling the needed Docker images.
kubectl
The most common way to interact with Kubernetes is using kubectl. After the cluster has been setup, rke generates a ready-to-use configuration file which you can use with kubectl, called .kube_config_cluster.yml. Before we can use the file, you will need to install kubectl. Please refer to Kubernetes documentation on how to do this for your operating system.
Note: the Kubernetes documentation helps you to place the downloaded binary in a directory in your $PATH. The following commands are based on having kubectl in your PATH.
When you have kubectl installed, make sure you execute the comand in the rke directory (because we point to .kube_config_cluster.yml in that directory).
Now you can check the cluster by getting the node status:
$ kubectl --kubeconfig .kube_config_cluster.yml get nodes --show-labels
NAME              STATUS    ROLES         AGE       VERSION           LABELS
IP_MASTER_HOST   Ready     etcd,master   5m       v1.8.3-rancher1   beta.kubernetes.io/arch=amd64,beta.kubernetes.io/os=linux,kubernetes.io/hostname=IP_MASTER_HOST,node-role.kubernetes.io/etcd=true,node-role.kubernetes.io/master=true
IP_WORKER_HOST     Ready     worker        5m       v1.8.3-rancher1   beta.kubernetes.io/arch=amd64,beta.kubernetes.io/os=linux,kubernetes.io/hostname=IP_WORKER_HOST,node-role.kubernetes.io/worker=true
IP_WORKER_LB_HOST     Ready     worker        5m       v1.8.3-rancher1   beta.kubernetes.io/arch=amd64,beta.kubernetes.io/os=linux,kubernetes.io/hostname=IP_WORKER_LB_HOST,node-role.kubernetes.io/worker=true
Note: as reference to each node, we will be using IP_MASTER_HOST, IP_WORKER_HOST and IP_WORKER_LB_HOST to identify respectively the master, worker, and the worker functioning as entrypoint (loadbalancer)
Three node cluster ready to run some containers. In the beginning I noted that we are going to use one worker node as loadbalancer, but at this point we can't differentiate both worker nodes. We need to use a host with the role worker. Let's make that possible by adding a label to that node:
$ kubectl --kubeconfig .kube_config_cluster.yml \
  label nodes IP_WORKER_LB_HOST role=loadbalancer
node "IP_WORKER_LB_HOST" labeled
Great, let's check if it was applied correctly:
$ kubectl --kubeconfig .kube_config_cluster.yml get nodes --show-labels
NAME              STATUS    ROLES         AGE       VERSION           LABELS
IP_MASTER_HOST   Ready     etcd,master   6m       v1.8.3-rancher1   beta.kubernetes.io/arch=amd64,beta.kubernetes.io/os=linux,kubernetes.io/hostname=IP_MASTER_HOST,node-role.kubernetes.io/etcd=true,node-role.kubernetes.io/master=true
IP_WORKER_HOST     Ready     worker        6m       v1.8.3-rancher1   beta.kubernetes.io/arch=amd64,beta.kubernetes.io/os=linux,kubernetes.io/hostname=IP_WORKER_HOST,node-role.kubernetes.io/worker=true
IP_WORKER_LB_HOST     Ready     worker        6m       v1.8.3-rancher1   beta.kubernetes.io/arch=amd64,beta.kubernetes.io/os=linux,kubernetes.io/hostname=IP_WORKER_LB_HOST,node-role.kubernetes.io/worker=true,role=loadbalancer
Note: If you mistakenly applied the label to the wrong host, you can remove it by adding a minus to the end of the label (e.g. kubectl --kubeconfig .kube_config_cluster.yml label nodes IP_WORKER_LB_HOST role=loadbalancer-)
Install and configure NGINX ingress controller
Helm
Helm is the package manager for Kubernetes, and allows you to easily install applications to your cluster. Helm uses charts to deploy applications; a chart is a collection of files that describe a related set of Kubernetes resources. Helm needs two components: a client (helm) and a server (tiller). Helm binaries are provided for all major platforms, download one and make sure it's available on your commandline (move it to a location in your $PATH). When installed correctly, you should be able to run helm help from the command line.
We bootstrap Helm by using the helm client to install tiller to the cluster. The helm command can use the same Kubernetes configuration file generated by rke. We tell helm which configuration to use by setting the KUBECONFIG environment variable as shown below:
$ cd rke
$ KUBECONFIG=.kube_config_cluster.yml helm init
Creating /homedirectory/username/.helm
Creating /homedirectory/username/.helm/repository
Creating /homedirectory/username/.helm/repository/cache
Creating /homedirectory/username/.helm/repository/local
Creating /homedirectory/username/.helm/plugins
Creating /homedirectory/username/.helm/starters
Creating /homedirectory/username/.helm/cache/archive
Creating /homedirectory/username/.helm/repository/repositories.yaml
Adding stable repo with URL: https://kubernetes-charts.storage.googleapis.com
Adding local repo with URL: http://127.0.0.1:8879/charts
$HELM_HOME has been configured at /homedirectory/username/.helm.

Tiller (the Helm server-side component) has been installed into your Kubernetes Cluster.
Happy Helming!
Assuming all went well, we can now check if Tiller is running by asking for the running version. Server should return a version here, as it will query the server side component (Tiller). It may take a minute to get Tiller started.
$ KUBECONFIG=.kube_config_cluster.yml helm version
Client: &version.Version{SemVer:"v2.7.2", GitCommit:"8478fb4fc723885b155c924d1c8c410b7a9444e6", GitTreeState:"clean"}
Server: &version.Version{SemVer:"v2.7.2", GitCommit:"8478fb4fc723885b155c924d1c8c410b7a9444e6", GitTreeState:"clean"}
A little bit on Pods, Services and Service Types
Services enable us to use service discovery within a Kubernetes cluster. Services allow us to use abstraction for one or more pods in your cluster. What is a pod? A pod is a set of one or more containers (usually Docker containers), with shared networking and storage. If you run a pod in your cluster, you usually would end up having two problems:
- Scale: When running a single pod, you don't have any redundancy. You want to use a mechanism which ensures to run a given amount of pods, and be able to scale if needed. We will talk more on this when we are going to deploy our demo application later on.
- Accessibility: What pods do you need to reach? (One static pod on one host is reachable, but how about scaling up and down, rescheduled pods?) and what IP address/name do you use the access the pod(s)?
By default, a Service will have the service type of ClusterIP. Which means it gets an internally accesible IP, which you can use to access your pods. The way the service knows what pods to target is by using a Label Selector. This will tell the Service to look for what labels on the pod to target.
Other service types are:
- NodePort: expose the service on every host's IP on a selected port or randomly selected from the configured NodePort range (default: 30000-32767)
- LoadBalancer: If a cloud provider is configured, this will request a loadbalancer from that cloudprovider and configure it as entrypoint. Cloud providers include AWS, Azure, GCE among others.
- ExternalName: This makes it possible to configure a service to route to a predefined name outside the cluster by using a CNAME record in DNS.
Installing NGINX ingress controller
As the NGINX ingress controller meets all of the criteria of the technical requirements, it resides in the stable directory of Helm charts. As noted before, we labeled one node as our point of entry by applying the role=loadbalancer label to that node. We'll be using that label to pass onto the Helm chart and let the NGINX ingress controller get placed on the correct node. By default, the NGINX ingress controller gets created as service type LoadBalancer. Because we are assuming that you are running on-premise, this will not work. Service LoadBalancer will provision a loadbalancer from the configured cloud provider, which we didn't configure and is usually not available on a on-premise setup. Because of this we will set the service type to ClusterIP using the --set controller.service.type=ClusterIP argument. Secondly, because we don't have a external loadbalancer to get access to the services, we will configure the controller to use host networking. This way, the NGINX ingress controller will be reachable on the IP of the host. You can do so by setting controller.hostNetwork to true.
*NOTE: Another option is to use NodePort , which will use a port from the cluster defined range (30000-32767). You can use an external loadbalancer to loadbalance to this port on the node. For the simplicity of this post, I went for hostNetwork.*
$ KUBECONFIG=.kube_config_cluster.yml helm install stable/nginx-ingress \
--name nginx-ingress --set controller.nodeSelector."role"=loadbalancer --set controller.service.type=ClusterIP --set controller.hostNetwork=true
Run the following command to see if the deployment was successful, we should see
$ kubectl --kubeconfig .kube_config_cluster.yml rollout \
  status deploy/nginx-ingress-nginx-ingress-controller
deployment "nginx-ingress-nginx-ingress-controller" successfully rolled out
By default, the NGINX ingress controller chart will also deploy a default backend which will return default backend - 404 when no hostname was matched to a service. Let's test if the default backend was deployed successfully:
# First we get the loadbalancer IP (IP of the host running the NGINX ingress controller) and save it to variable $LOADBALANCERIP
$ LOADBALANCERIP=`kubectl --kubeconfig .kube_config_cluster.yml get node -l role=loadbalancer -o jsonpath={.items[*].status.addresses[?\(@.type==\"InternalIP\"\)].address}`
# Now we can curl that IP to see if we get the correct response
$ curl $LOADBALANCERIP
default backend - 404
Excellent, we reached the NGINX ingress controller. As there are no services defined, we get routed to the default backend which returns a 404.
Setup wildcard DNS entry
For this post, I decided to make a single host the entrypoint to the cluster. We applied the label role=loadbalancer to this host, and used it to schedule the deploy of the NGINX ingress controller. Now you can point a wildcard DNS record (*.kubernetes.yourdomain.com for example), to this IP. This will make sure that the hostname we will use for our demo application, will end it up on the host running the NGINX ingress controller (our designated entrypoint). In DNS terminology this would be (in this example, $LOADBALANCER is 10.10.10.10)
*.kubernetes IN A 10.10.10.10
With this configured, you can try reaching the default backend by running the curl to a host which resides under this wildcard record, i.e. dummy.kubernetes.yourdomain.com.
$ curl dummy.kubernetes.yourdomain.com
default backend - 404
Running and accessing the demo application
A little bit on ReplicaSet, Deployment and Ingress
Before we deploy our demo application, some explanation is needed on the terminology. Earlier, we talked about Services and services types to provide access to your pod/group of pods. And that running pods alone is not a failure-tolerant way of running your workload. To make this better, we can use a ReplicaSet. The basic functionality of a ReplicaSet is to run a specified number of pods. This would solve our problem of running single pods.
From the Kubernetes documentation:
While ReplicaSets can be used independently, today it’s mainly used by Deployments as a mechanism to orchestrate pod creation, deletion and updates. When you use Deployments you don’t have to worry about managing the ReplicaSets that they create. Deployments own and manage their ReplicaSets.
Deployments give us some other nice benefits, like checking the rollout status using kubectl rollout status. We will be using this when we deploy our demo application.
Last but not least, the Ingress. Usually, the components in your cluster will be for internal use. The components need to reach each other (web application, key value store, database) using the cluster network. But sometimes, you want to reach the cluster services from the outside (like our demo application). To make this possible, you need to deploy an Ingress definition. Deploying an Ingress definition without using an Ingress controller will give you limited functionality, that's why we deployed the NGINX ingress controller. By using the following key value under annotations, we make sure the NGINX ingress controller picks up our Ingress definition: kubernetes.io/ingress.class: "nginx"
Deploy demo application
For this post, we are using a simple web application. When you visit this web application, the UI will show you every container serving requests for this web application.
Let's create the files necessary to deploy our application, we'll be using a Deployment to create a ReplicaSet with 2 replicas and a Service to link our ingress to. Save to following as docker-demo.yml in the rke directory.
apiVersion: apps/v1beta2
kind: Deployment
metadata:
  name: docker-demo-deployment
spec:
  selector:
    matchLabels:
      app: docker-demo
  replicas: 2
  template:
    metadata:
      labels:
        app: docker-demo
    spec:
      containers:
      - name: docker-demo
        image: ehazlett/docker-demo
        ports:
        - containerPort: 8080

---

apiVersion: v1
kind: Service
metadata:
  name: docker-demo-svc
spec:
  ports:
  - port: 8080
    targetPort: 8080
    protocol: TCP
  selector:
    app: docker-demo
Let's deploy this using kubectl:
$ kubectl --kubeconfig .kube_config_cluster.yml create -f docker-demo.yml
deployment "docker-demo-deployment" created
service "docker-demo-svc" created
Again, like in the previous deployment, we can query the deployment for its rollout status:
$ kubectl --kubeconfig .kube_config_cluster.yml rollout \
  status deploy/docker-demo-deployment
deployment "docker-demo-deployment" successfully rolled out
With this running, the web application is now accessible within the cluster. This is great when you need to connect web applications with backends like key-value stores, databases etcetera. For now, we just want this web application to be available through our loadbalancer. As we've already deployed the NGINX ingress controller before, we can now make our application accessible by using an Ingress resource. Let's create the ingress.yml file:
apiVersion: extensions/v1beta1
kind: Ingress
metadata:
  name: docker-demo-ingress
  annotations:
    kubernetes.io/ingress.class: "nginx"
spec:
  rules:
  - host: docker-demo.kubernetes.yourdomain.com
    http:
      paths:
      - path: /
        backend:
          serviceName: docker-demo-svc
          servicePort: 8080
This is a fairly standard Ingress definition, we define a name and rules to access an application. We define the host that should be matched docker-demo.kubernetes.yourdomain.com, and what path should route to what backend service on what port. The annotation kubernetes.io/ingress.class: "nginx" tells the NGINX ingress controller that this Ingress resource should be processed. When this Ingress is created, the NGINX ingress controller will see it, process the rules (in this case, create a "vhost" and point it the backend/upstream to the created pods in the ReplicaSet created by the Deployment ). This means, after creation, you should be able to reach this web application on http://docker-demo.kubernetes.yourdomain.com. Let's launch the ingress and find out:
$ kubectl --kubeconfig .kube_config_cluster.yml create -f ingress.yml
ingress "docker-demo-ingress" created
Check out the web application on http://docker-demo.kubernetes.yourdomain.com
Wrapping up
Is this a full blown production setup? No. Keep in mind that it will need some work, but hopefully you have gained a basic understanding of some of the core parts of Kubernetes, how to deploy Kubernetes using rke, how to use Helm and the basics of the NGINX ingress controller. Let me give you some resources to continue the journey:
Try to scale your deployment to show more containers in the web application (
kubectl scale -h)rkesupports HA, you can (and should) deploy multiple hosts with thecontrolplaneand/or theetcdrole.Take a look at all the options of the NGINX ingress controller, see if it suits your needs
Explore how easy it is to use Let's Encrypt certificates on your ingresses by setting an extra annotation using kube-lego.
The NGINX ingress controller is a single point of failure (SPOF) now, explore how you can make this go away. Most companies use some kind of external loadbalancer which you could use for this.
Keep an eye on the Kubernetes Incubator Project external-dns, which can automatically create DNS records in supported providers.
To gain a deeper understanding of all the Kubernetes components, check out Kubernetes The Hard Way.


No comments :
Post a Comment